Ready to learn the forehand volley? OK. There's the block volley, the swinging volley,
the touch volley, the angle volley, the drop volley, the high volley, the low volley, and the half
volley. Bu if that seems like a lot, don't panic, because I'm here to show them all to you,
step by step.
The Grip
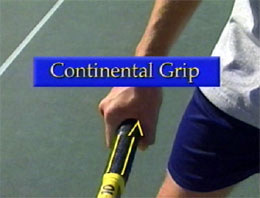
One thing all these volleys do have in common is the grip. The continental grip is equally
effective for both the forehand and backhand side, as well as for the bottom hand on two handed backhand volleys.
The continental grip positions the V shape between your thumb and first finger in line with the top edge of
the grip. Since this is also the grip for serves and overheads, you'll find when you serve and volley,
you never have to change your grip.
The continental is THE grip.
The continental grip provides the best support and control for the racquet face at contact
throughout your full range of motion. Notice how the elbow is positioned inward as the wrist remains in a
strong position when using this grip.
Split Step
The volley doesn't exist in a vacuum. It's part of a pattern of movement forward to the
net that begins with the approach and ends, hopefully, with you winning the point. The key move for
transiting from the approach to the volley itself is the split step.
When you split stay light on your feet and ready to move.
As your opponent is about to make contact, you split step to gain control of your body's
forward momentum and establish your balance. The split step also allows you to read the opponent's next
shot and make your move to the ball.
The timing of your split step must be in sync with the opponent's contact to allow you
time to react. Even a fraction of a second late on your split will often close your window of
opportunity to cover the ball and hit a forcing volley.
The elbow is in for support and control.
Stay light on your feet, energized, and ready to make your move. If you plant your
feet too heavily, stopping all your forward momentum, you will find it will be much more difficult
to move to the ball. All too often, when the body weight gets planted back on the heels, you end
up watching the passing shot go by. Don't get too settled in.
In the ready position on your split step you should have your arms and racquet out in
front of you, centered between your shoulders, putting you at the midpoint so that you can turn to
either the forehand or the backhand side.
Hands high, racket head pointed up, light feel.
The racquet should be partially in front of your face. Keeping the racquet head above
your hands and pointed upward will create a lighter feel to the racquet, allowing you to be quicker
on preparation for the volleys. When you have to reflex in situations with less than a second to
execute, any excess motion in your preparation will make you late for the shot.
Most of the time when you are at the net, you will be volleying in quick reflex mode.
Your preparation needs to be compact with no excess motion. Your objective is to prepare immediately
for contact. You'll use the pace that is already on the passing shots, so you won't need
a back swing.
Like the catch in baseball, the elbow doesn't move backwards.
A great analogy for understanding the preparation and the mentality on the volley is to
study the catch in baseball. Watch the right elbow closely as it prepares for the catch. There's no
backward movement of the elbow. The arm and glove move forward to meet the ball.
On the volley, the same movement should occur. You want to eliminate any backward
movement of the elbow in your preparation on the volley. Even though the racquet head may be
going back slightly, the elbow is still going forward in the process.
The racket head may go back but the elbow moves forward.
The best way to test and train the correct preparation habit is by positioning
yourself up against the back fence and having someone feed you volleys. If your racquet head
hits the back fence, you're taking a back swing. This exercise will help you eliminate that
and come forward to meet the ball.
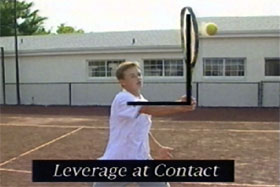
Your preparation should position the racquet in front of you so that your contact
point is preferably between your shoulders and in line with the center of your chest. Your racquet
and arm should make an L shape, showing strong leverage in the wrist position. On your basic block
volley, used in reflex situations there's very little if any follow through. Remember, you're
thinking catch, not swing.
The test for taking a backswing.
Leverage in the wrist comes from the "L" shape.
The Block Volley
On a block volley, the arm and racquet function is one solid unit, blocking the ball
like a backboard. To achieve depth, use your footwork to drive your body weight into contact to
help provide punch to your volley as your arm and racquet remain firm.
Watch the arm and racket move forward as a unit.
When the ball is well within your reach, you can create angle volleys by moving your
contact point more out in front of you, allowing you to angle the racquet face. For the inside out
angle volley, you must allow your hand to get a little ahead of your contact point to create the
inside out angle in the racquet.
When you have to lunge and reach for volleys, you can create angle in the racquet face by
adjusting the position of your wrist. For those softer angled touch volleys used to put away the ball,
you must create the angle in your racquet face, then be prepared to use your arm and racquet
like a shock absorber.
Drop Volley
To execute a drop volley, your arm and racquet must again function like a shock absorber,
absorbing nearly all the pace of the incoming shot. Your preparation positions the racquet face directly
to contact point position and in your mind, you're thinking,
"Catch the ball on contact."
The racket and arm recoil as a unit.
On impact, the wrist position maintains enough firmness to keep the racquet and arm
together as one solid unit. Watch how the elbow holds position and on impact the lower forearm
and racquet recoil together, absorbing the shock of the ball. But make sure your hand doesn't
grip too tightly or you'll lose flexibility and feel for the shot.
Your setup for the drop volley should have the same preparation as your deep volley,
disguising the shot so the opponent can't anticipate the depth. Your intent on the drop volley
should not be to make the shot perfect, just good enough to force the opponent. If you go for
the outright winners, you'll end up making too many errors.
Low volley keys: Getting down and spreading your feet.
Low Volley
In many first volley situations, you'll have to execute the low volley, making
contact just before the ball bounces. You must force yourself to get down for these shots by
spreading your feet and really bending your knees.
You should realize that the opponent has you in a defensive position, having
hit the ball to your feet. So don't rush through this shot. Take the time to get the ball
back into play, and hopefully deep. To give the ball lift over the net, you should angle
the racquet face so that it is open slightly.
Half Volley
You should make every effort to get to the ball and volley it before it bounces
so that you don't lose offensive control of the point. But at times, you will be caught in
situations where you must half volley. Executing the half volley is not all that difficult
if you keep it simple and don't panic.
Treat it just like the low volley by getting down to make the shot. Determine
where the ball will bounce, then position the racquet head directly behind that spot.
On the low volley, position the racket head behind the bounce.
The closer you can position the racquet behind the bounce, the better you can judge
the height of contact and the timing. Using a slightly open racquet face, you can either block
the ball or add a little punch with a follow through. The half volley drop shot is often a great
solution to force the opponent. But avoid trying to make the shot better than it
needs to be.
When you're in a first volley situation, your low volleys and half volleys work like
approach shots used to improve your net position to close the point. Using a percentage shot pattern
rule for approach shots, the down the line direction will provide the shortest path to reaching your
closing net position for the next shot.
When working with the low setup volleys near the center mid court, choosing to hit the
volley straight ahead down the center of the court reduces the passing shot angles and makes the lob
a more difficult option for the opponent.
Recovery for the volley is even more important than recovery on a groundstroke. Why?
When you are at the net the ball is going to reach you as much as 40% faster. The initial volley's
important, but the recovery for the second volley and the covering of position is even
more essential.
On the high volley, drive the butt of the racket forward and down
High Volley
The high volley can be a very awkward shot for many players, especially when the
incoming ball is a high floater. Typically, you get anxious to swing at it and if you don't use
the right technique, the ball can end up hitting the fence on the fly.
When you need to apply some pace to the volley, there's one key element to remember.
As you prepare for the volley with your elbow moving forward as the first move, you should angle
the butt of the racquet towards the ball.
As the forward action begins, you drive the butt of the racquet forward and down along
the path like a waterfall. This action sends the racquet face up into contact with plenty of pop.
Notice there's no snapping of the wrist in this action. The wrist maintains the strong leverage
position through contact. You can learn to add power with great control using this technique
for the high floating volley.
The Swinging Volley
The swinging volley has always been a trademark of the Bollettieri Academy students.
We teach this shot to be used as a tool for sneak attack out of the rally. It is basically nothing
more than a regular ground stroke without letting the ball bounce.
The swinging volley: a groundstroke hit in the air.
Shifting to the same grip you use on your forehand ground stroke, your back swing should
be short and compact. You are preparing to take a slightly low to high stroke. Position yourself so
you can work with the ball within your preferred contact zone.
You should add some top spin and build margin of error into this shot as you try to force the
opponent. Follow this shot to net as you would on any approach shot to close the point if necessary.
Stay Tuned because in the next article we'll look at the backhand volley in the same detailed way.
Nick Bollettieri is the legendary coach who invented the concept of the tennis academy
more than 30 years ago. He has trained thousands of elite players, including some of the greatest
champions in the history of the game, players like Andre Agassi, Tommy Haas, Jim Courier, Monica Seles,
and Boris Becker, as well as upcoming stars including Maria Sharapova. IMG Bollettieri Academies are located in Bradenton, Florida.