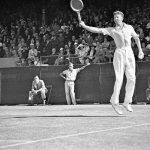
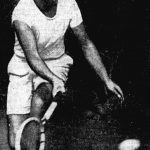
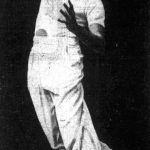
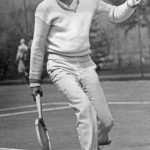
Rod Laver
CC0 — Wikimedia

Rod Laver "Rocket"

Australia
Golden Era Retired #1 career high 198 titles Left-handed One-Handed BH 175cm
11 Grand Slams
  • Australian Open 3
  • Roland Garros 2
  • Wimbledon 4
  • US Open 2
Left-handed legend who completed the Grand Slam twice (1962, 1969). Complete player with topspin, power, and extraordinary wrist strength on every shot.

Coaches: Harry Hopman

Video Library (38 videos)

Name FPS Duration
Laver Ed Atkinson's forehand from the center of the baseline, filmed from a rear angle. At contact his racket face is slightly closed with the ball meeting the strings just above waist height as the racket accelerates steeply upward along the swing path.
39.4s
Laver How Greatwas Hoad #10715 Rod Laver's forehand from a neutral position, filmed from a rear court-level angle. His shoulders rotate well past 90 degrees relative to his hips on the unit turn, then the trunk uncoils sequentially from the pelvis upward before contact.
9.9s
Laver Laver's forehand from the center of the baseline, filmed from a side court-level angle. His follow-through finishes high with the hitting arm wrapping across his body while his weight moves forward into the court and his non-hitting hand helps him quickly return to a ready position.
2.3s
High Allen Fox’s neutral rally forehand from mid-court, filmed from a rear angle. His small adjustment steps before setting into a semi-open stance and the quick recovery shuffle back to center are clearly visible.
6s
Laver.Serve Rod Laver's serve from a central baseline position, filmed from a rear angle. His racket face stays closed with a pronounced upward whip at contact, meeting the ball slightly above head height to create strong racket head acceleration through the hitting zone.
3.4s
Laver #2 Ed Atkinson's forehand from the center of the baseline, filmed from a rear angle. His compact split-step just before contact and quick adjustment into a semi-open stance are clearly visible as he sets up for the shot.
39.4s
Laver #3 Ed Atkinson's forehand from the center of the baseline, filmed from a rear court-level angle. His hips stay relatively closed during the unit turn before driving through with a pronounced knee bend and upward leg drive into the shot.
39.4s
Laver Open Stance Forehand Kerry Mitchell's forehand from a neutral court position in open stance, filmed from a court-level angle. His hips stay relatively open to the net as he drives off the outside leg, with a deep knee bend that loads the right hip before unwinding into contact.
1.4s
Laver Serve Animation Allen Fox's serve from the center of the baseline, filmed from a side angle. His follow-through carries his racket arm down across his body as his back leg swings forward into the court, bringing him quickly into a balanced ready position.
4.7s
Laver.Serve Court Level Side Tigh Rod Laver's serve from a neutral position, filmed from a tight court-level side angle. His continental grip is evident in the way the racquet angle stays slightly open at the trophy position, with a pronounced wrist pronation driving the racquet head through contact.
1.9s
Serve Court Level Side #1 Rod Laver's serve from the baseline, filmed from a court-level side angle. His shoulders load with a pronounced turn relative to his hips before uncoiling in sequence, making the trunk rotation and upward drive into the ball easy to distinguish from this side view.
1.6s
Serve Court Level Side #2 Rod Laver's serve from the center, filmed from a court_level_side angle. His continental grip is firm with a notably relaxed wrist that pronates sharply through contact, creating a distinct snap just after impact.
1.9s
Serve Front Rod Laver's serve from a central position, filmed from the front. His footwork includes a rhythmic rocking motion into a pinpoint stance, with a pronounced front-leg drive and balanced landing inside the court before a small recovery step.
1.3s
BH Ed Atkinson's backhand from a neutral baseline position, filmed from a side angle. His classic backhand grip is clearly visible with a firm, slightly closed racquet face and a noticeable stable wrist position through contact.
4.6s
BH Half Volley Rod Laver's backhand half volley from a neutral court position, filmed from a court-level angle. The racket face is slightly open at contact with the ball taken just in front of his body and below net height, with a compact, abbreviated swing path through impact.
2s
BH Pass Rod Laver's backhand passing shot from a neutral position, filmed from a side angle. His follow-through finishes high with the racquet wrapping across his body as he quickly regains a ready position with both hands returning to the handle.
3s
BH · Court-level-front #1 Rod Laver's backhand from the center of the court, filmed from a court level front angle. His footwork includes a quick adjustment step into a neutral stance with a pronounced weight transfer onto the front leg before swinging through the ball.
4.7s
BH · Court-level-front #2 Rod Laver's backhand from the center court position, filmed from a court-level front angle. His shoulders turn well past perpendicular to the net before contact, then the trunk uncoils in sync with the hitting arm, making the torso rotation clearly lead the one-handed backhand swing.
3s
BH Half Volley · Court-level-front Rod Laver's backhand half volley from the middle of the court, filmed from a court-level front angle. His low, deep knee bend and forward-driving left hip are clearly visible as he stays compact over the ball with a strong push off his legs.
2.1s
BH Volley · Court-level-front Rod Laver's backhand volley from a central net position, filmed from a court-level front angle. His shoulders stay relatively square to the net with only a slight trunk rotation, and the forward uncoiling of his torso is tightly linked to a compact shoulder-driven punch through the ball.
1.7s
BH Volley → OH → BH Volley → BH Volley · Court-level-front Rod Laver's backhand volley from the center of the court, filmed from a court_level front angle. After contact his racquet finishes slightly in front of his body as he steps through with his weight moving forward, quickly bringing both hands back toward a compact ready position for the next shot.
11.4s
BH Volley · Court-level-front #1 Rod Laver's backhand volley from the net area, filmed from a court-level front angle. His compact split step into a slightly closed stance is followed by a short crossover step toward the ball before he plants and punches through the volley.
3.5s
BH Volley · Court-level-front #2 Rod Laver's backhand volley from the front court, filmed from a court-level angle. His continental grip is clearly visible, with a firm but relaxed wrist that stays stable through contact without excessive wrist flick.
3.3s
BH Volley → OH · Court-level-front Rod Laver's backhand volley from a neutral net position, filmed from a court-level front angle. After contact he finishes with the racquet head high in front while his weight continues moving forward, quickly bringing both hands back toward a compact ready position for the next shot.
5.8s
BH Volley · Court-level-side Rod Laver's backhand volley from the net area, filmed from a court-level side angle. His shoulders stay relatively square with a compact trunk rotation, with a brief, efficient coil and uncoil that links his upper body to the forward step into the volley.
2.7s
BH Volley · Front #1 Rod Laver's backhand volley from a central net position, filmed from the front. The racket face is slightly open at contact in front of his body, with a compact punch and firm wrist creating a crisp, abbreviated swing path through the ball.
3.4s
BH Volley · Front #2 Rod Laver's backhand volley from the net, filmed from the front. His racket face is slightly open at contact with the ball meeting the strings just in front of his body and around waist height, with a compact forward punch through the hitting zone.
3.4s
FH · Court-level-front Rod Laver's forehand from a central court position, filmed from a court-level front angle. His footwork shows a quick adjustment step into a neutral stance before contact, followed by a small recovery hop to re-center for the next ball.
2.3s
FH Short · Court-level-front Rod Laver's forehand from the short court, filmed from a court-level front angle. His hips stay relatively closed at the start, with a pronounced knee bend and forward leg drive as he steps into the ball.
2.1s
FH Volley #1 Rod Laver's forehand volley from a central net position, filmed from a front court-level angle. His shoulders stay relatively square to the net with only a slight trunk rotation, making the volley mostly an arm‑driven punch with minimal torso coil or uncoil.
1.5s
FH Volley #2 Rod Laver's forehand volley from a neutral net position, filmed from a front court-level angle. His hips stay relatively square to the net while a slight knee bend and subtle forward leg drive support a compact, stable volley action.
1.4s
BH Volley → FH Volley → OH · Court-level-front Rod Laver's forehand volley from the front of the court, filmed from a court-level front angle. At contact his racket face is slightly open with the ball struck just in front of his lead shoulder, and the compact punchy swing keeps the racket head moving directly through the ball.
6.1s
FH Volley · Court-level-front #1 Rod Laver's forehand volley from the center of the court, filmed from a court_level front angle. His continental grip is firm with a slightly laid-back wrist, holding that angle steadily through contact rather than snapping or rolling the wrist.
1.4s
FH Volley · Court-level-front #2 Rod Laver's forehand volley from the net area, filmed from a court-level front angle. His hips stay relatively square to the net while a subtle knee bend and forward leg drive support a stable, compact volley stance.
2.3s
FH Volley → OH · Court-level-rear Rod Laver's forehand volley from a central net position, filmed from a court-level rear angle. After contact he finishes with his racquet hand extending slightly across his body while his weight moves forward into the court, quickly bringing the racquet back to a compact ready position for the next shot.
10.2s
OH Rod Laver's overhead from the center of the court, filmed from a rear angle. His quick adjustment steps position him directly under the ball before he plants in a neutral stance to strike the overhead.
2s
OH · Court-level-front Rod Laver's overhead from the center of the court, filmed from a court-level front angle. His hips stay relatively square to the net while his legs drive upward with a pronounced knee bend before extension into the contact.
2s
BH Slice · Court-level-front Rod Laver's backhand slice from a central court position, filmed from a court-level front angle. At contact his racket face is noticeably open with the ball struck around waist height, and the racket travels on a distinct high-to-low path that keeps the strings moving through the ball.
2.2s