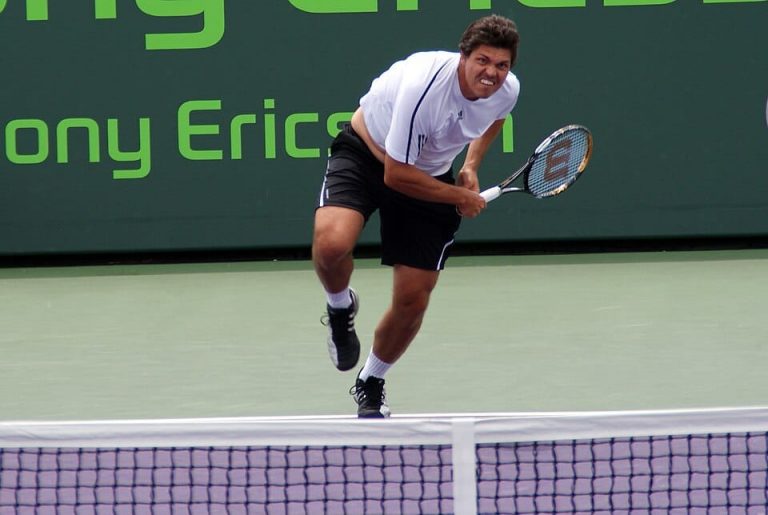
BH Approach → BH Volley · Court-level-front
Taylor Dent's backhand approach shot from a central position, filmed from a court-level front angle. His follow-through finishes high with the non-hitting hand extending back for balance before he quickly moves forward into a compact ready position for the ensuing volley.
|
|
6s |
BH Slice → Approach → BH Volley · Court-level-side
Taylor Dent's backhand slice approach and backhand volley from the side, filmed from a court-level side angle. His hips stay relatively closed through the slice approach with a noticeable knee bend and forward-driving step, then transition into a more upright, braced leg position as he plants for the backhand volley.
|
|
4.9s |
FH Approach → BH Volley · Court-level-side
Taylor Dent's forehand approach and backhand volley from the center of the court, filmed from a court level side angle. His forward footwork includes a quick adjustment shuffle into a semi-open stance on the approach, followed by a small hop-step to set the base before transitioning into the volley.
|
|
4.8s |
BH Center · Court-level-front
Taylor Dent's backhand from the center of the court, filmed from a front court_level angle. At contact his one-handed backhand is struck around waist height with a slightly closed racket face and a forward extension that keeps the racket head moving straight through the ball before wrapping across his body.
|
|
2.9s |
BH Wide · Court-level-front · Closed #1
Taylor Dent's one-handed backhand from a wide ball on the ad side in a closed stance, filmed from a court-level front angle. His shoulders rotate well past perpendicular to the net on the unit turn, then the trunk uncoils ahead of the arm swing so the chest is already starting to face forward as the racquet moves through contact.
|
|
2.4s |
BH Wide · Court-level-front · Closed #2
Taylor Dent's wide backhand from a closed stance, filmed from a court-level front angle. The racket face is slightly closed at contact with the ball struck around waist height in front of his body, and the one-handed swing drives forward with noticeable racket head acceleration through the hitting zone.
|
|
2.6s |
BH Wide · Court-level-front · Closed #3
Taylor Dent's wide backhand from a closed stance on the ad side, filmed from a court-level front angle. His one-handed backhand uses a firm eastern grip with notable wrist stability, showing minimal wrist flexion through contact before a controlled release into the follow-through.
|
|
2.6s |
BH Wide · Court-level-front #1
Taylor Dent's wide backhand from the middle of the court, filmed from a court_level front angle. His initial split-step leads into a quick lateral push off the outside leg, setting up a slightly open stance before he drives through the one-handed backhand and recovers back toward the center.
|
|
2.6s |
BH Wide · Court-level-front #2
Taylor Dent's backhand from a wide position, filmed from a court_level front angle. His split-step leads into a quick crossover step to reach the wide ball, transitioning into a neutral stance at contact before taking recovery steps back toward the center.
|
|
2.7s |
BH Half Volley · Court-level-rear
Taylor Dent's backhand half-volley from the center of the court, filmed from a court-level rear angle. His feet stay relatively wide with a compact adjustment step into a neutral stance as he absorbs the ball early off the bounce and keeps his weight slightly forward moving toward the net.
|
|
2.4s |
BH Center · Court-level-side #1
Taylor Dent's backhand from the center of the court, filmed from a court-level side angle. His knees load deeply before contact and you can see his hips stay relatively closed through the swing, with a strong push off the back leg driving him into the shot.
|
|
3.1s |
BH Center · Court-level-side #2
Taylor Dent's backhand from the center of the court, filmed from a court-level side angle. His one-handed follow-through finishes high with the hitting arm extending forward while his weight transfers into the court, bringing him quickly back toward a neutral ready position.
|
|
2.9s |
BH Center · Court-level-side #3
Taylor Dent's backhand from the center of the court, filmed from a court-level side angle. His eastern one-handed backhand grip is clear, with a laid-back wrist creating noticeable lag before he firms it up into a strong, slightly pronated position at contact.
|
|
2.8s |
BH Center · Court-level-side #4
Taylor Dent's backhand from center court, filmed from a court-level side angle. His one-handed backhand grip is clearly eastern with a noticeable laid-back wrist position creating lag before he drives the racket head through contact.
|
|
3.1s |
BH Drop Volley · Court-level-side
Taylor Dent's backhand drop volley from the net area, filmed from a court-level side angle. His knees stay flexed with a low center of gravity, and his hips remain relatively square to the net as he lightly steps through the ball with minimal leg drive.
|
|
2.9s |
BH Moves Back · Court-level-side
Taylor Dent's backhand while moving back from a neutral court position, filmed from a court-level side angle. His footwork features quick retreating adjustment steps into a slightly open stance before contact, followed by a small recovery step to re-center.
|
|
2.6s |
BH Short · Court-level-side
Taylor Dent's backhand from the short court, filmed from a court-level side angle. His one-handed backhand follow-through finishes high with the non-hitting arm counterbalancing behind him before he quickly resets his feet into a neutral ready position.
|
|
3.3s |
BH Wide · Court-level-side · Closed #1
Taylor Dent's wide backhand from a closed stance on the deuce side, filmed from a court-level side angle. The racket face is slightly open at contact with the ball struck around waist height, and the one-handed swing path extends forward with noticeable racket head acceleration through the hitting zone.
|
|
2.6s |
BH Wide · Court-level-side · Closed #2
Taylor Dent's one-handed backhand to a wide ball from a closed stance, filmed from a court-level side angle. From this side view, his eastern backhand grip is clear, with a noticeable laid-back wrist creating lag before he straightens it through contact.
|
|
2.9s |
BH Wide · Court-level-side · Closed #3
Taylor Dent's backhand from the deuce side, filmed from a court-level side angle. He takes a wide step out to the ball and plants in a clearly closed stance, then uses a strong rear-leg push-off to recover back toward the center.
|
|
2.4s |
BH Wide · Court-level-side #5
Taylor Dent's wide backhand from the side of the court, filmed from a court-level side angle. His shoulders rotate early to form a strong trunk coil, then uncoil in sequence from hips to shoulders, making the degree of upper-body rotation and timing of the release easy to distinguish.
|
|
2.8s |
BH Wide · Court-level-side · Open
Taylor Dent's backhand from a wide ball on the deuce side in an open stance, filmed from a court-level side angle. From this angle you can clearly see his one-handed backhand grip set early with a firm wrist and noticeable lag that straightens through contact without excessive wrist snap.
|
|
2.8s |
BH Wide · Court-level-side · Open #2
Taylor Dent's backhand wide from an open stance on the deuce side, filmed from a court-level side angle. His one-handed backhand contact is made slightly in front of his body with the racket face relatively square to the ball and the swing path extending forward through the shot.
|
|
3s |
BH Center · Front
Taylor Dent's backhand from the center of the court, filmed from the front. At contact his one-handed backhand is struck around waist height with a slightly closed racket face and a steep upward swing path, indicating strong racket head acceleration through the ball.
|
|
2.4s |
BH Half Volley · Front #1
Taylor Dent's backhand half-volley from the front, filmed from a front court-level angle. After contact his racquet finishes slightly up and across his body while his weight stays low and forward, and he quickly brings both hands back toward his torso to recover into a compact ready position near the net.
|
|
2.4s |
BH Half Volley · Front #2
Taylor Dent's backhand half-volley from the front, filmed from a front court-level angle. His one-handed grip stays firm with minimal wrist lag, and you can see a subtle, controlled wrist firmness at contact to stabilize the racquet face on the low ball.
|
|
2.1s |
BH Short · Front
Taylor Dent's backhand from the center of the court, filmed from the front. His eastern one-handed backhand grip is clearly visible, with a firm but relaxed wrist that stays laid back through the takeback and then straightens through contact without excessive wrist snap.
|
|
3.3s |
BH Wide · Front · Closed
Taylor Dent's one-handed backhand to a wide ball from a closed stance, filmed from the front. His eastern backhand grip is easy to see, with a firm but relaxed wrist that stays laid back through the swing before straightening slightly through contact.
|
|
4s |
BH Drop Volley · Rear
Taylor Dent's backhand drop shot from a central baseline position, filmed from the rear. His hips stay relatively closed while his knees soften and weight stays more on the back leg, supporting a gentle, compact leg drive into the delicate drop shot.
|
|
2.8s |
BH Half Volley · Rear #1
Taylor Dent's backhand half-volley from the center of the court, filmed from a rear angle. His shoulders stay relatively closed with a compact trunk rotation, and the uncoil is abbreviated so the kinetic chain transfers just enough energy for control rather than a full driving swing.
|
|
2s |
BH Half Volley · Rear #2
Taylor Dent's backhand half-volley from a neutral position, filmed from a rear angle. The racket face is slightly open at contact with the ball taken just below net height, and the compact swing path keeps the racket head moving almost straight through the line of the incoming shot.
|
|
2s |
BH Moves Back · Rear
Taylor Dent's backhand while moving back from a neutral court position, filmed from the rear. His hips stay relatively closed as he retreats, with a noticeable knee bend and leg drive off the outside leg to stabilize and transfer weight into the one-handed backhand.
|
|
3.3s |
BH Short · Rear
Taylor Dent's backhand from the center of the court, filmed from a rear angle. He plants in a mostly neutral stance with a small adjustment step before contact, then uses a quick crossover recovery step to return toward the middle.
|
|
3.2s |
Half Volley · Side #0001
Taylor Dent's backhand volley from the net on the deuce side, filmed from a side angle. His shoulders stay relatively square with only a mild trunk coil, and the uncoil is short and compact, with the hitting-side shoulder moving slightly through as the kinetic chain transfers forward into the volley.
|
|
8.9s |
Half Volley · Side #0001
Taylor Dent's backhand half volley from the middle of the court, filmed from the side. The racket face is slightly open at contact with the ball taken just in front of his body and around waist height, with a compact forward punch and minimal backswing.
|
|
6.5s |
BH Drop Volley · Side
Taylor Dent's backhand drop volley from the net area, filmed from the side. The racket face is visibly open at contact with the ball taken slightly in front of his body, creating a soft, abrupt deceleration of the racket head through impact.
|
|
3.2s |
BH Half Volley · Side #1
Taylor Dent's backhand half-volley from the baseline, filmed from the side. His follow-through stays compact with the racquet finishing in front as he quickly regains a low, stable ready position with his weight slightly forward.
|
|
2.3s |
BH Half Volley · Side #2
Taylor Dent's backhand from the baseline on the deuce side, filmed from the side. His feet set in a neutral stance with a pronounced unit turn, and he uses a small adjustment hop before driving off his outside leg into the shot.
|
|
2.3s |
BH Half Volley · Side #3
Taylor Dent's backhand from the side, filmed from a side angle. His footwork includes a small adjustment hop into a neutral stance, with a clear weight transfer from the back foot to the front as he steps into the ball.
|
|
2.5s |
BH Wide · Side · Closed #1
Taylor Dent's wide backhand from a closed stance on the side of the court, filmed from the side. His shoulders rotate well past 90 degrees relative to his hips on the unit turn, then the trunk uncoils ahead of the arm to drive the one-handed backhand through contact.
|
|
2.1s |
BH Wide · Side · Closed #2
Taylor Dent's wide backhand from a closed stance, filmed from the side. His follow-through finishes high with the hitting arm extending across his body while his weight transfers onto the front foot, bringing him quickly back toward a ready position.
|
|
2.4s |
BH Wide · Side
Taylor Dent's backhand from a wide position, filmed from the side. His follow-through finishes high with the hitting arm extending out toward the target while his weight transfers into the court and his non-hitting hand quickly returns to a ready position.
|
|
3.5s |
BH Volley · Court-level-front #3
Taylor Dent's backhand volley from the center of the court, filmed from a court-level front angle. At contact his racket face is slightly open with the ball meeting the strings just in front of his lead hip, and the compact punch-like swing keeps the racket head traveling mostly straight through the ball.
|
|
1.7s |
BH Volley · Court-level-front #4
Taylor Dent's backhand volley from the center of the court, filmed from a court-level front angle. His hips stay relatively square to the net while his knees are slightly flexed, giving a stable base as he steps forward through the volley.
|
|
2s |
BH Volley · Court-level-front #5
Taylor Dent's backhand volley from the center of the court, filmed from a court-level front angle. His continental grip is firm with a slightly laid-back wrist, and you can see the wrist stay stable through contact with only a short, controlled punch forward.
|
|
2.5s |
BH Volley · Court-level-rear
Taylor Dent's backhand volley from the center of the court, filmed from a court-level rear angle. His shoulders stay relatively square to the net with minimal trunk rotation, so the volley is driven mostly by a compact shoulder-stabilized arm action rather than a pronounced coil and uncoil through the torso.
|
|
2.5s |
BH Volley · Court-level-side #1
Taylor Dent's backhand volley from the net, filmed from a court-level side angle. His continental grip is clearly visible, with a firm but relaxed wrist that stays stable through contact without excessive wrist flick.
|
|
2.4s |
BH Volley · Court-level-side #2
Taylor Dent's backhand volley from the net on the deuce side, filmed from a court-level side angle. The racket face is slightly open at contact with the ball struck just in front of his lead hip, showing a compact punching motion with minimal backswing.
|
|
2.2s |
BH Volley · Court-level-side #3
Taylor Dent's backhand volley from the center of the court, filmed from a court-level side angle. His shoulders stay relatively square to the net with only a modest trunk rotation, and the side view makes it easy to see the compact upper-body turn and quick uncoil through contact.
|
|
2.3s |
BH Volley · Court-level-side #4
Taylor Dent's backhand volley from the middle of the court, filmed from a court-level side angle. His knees stay flexed with a strong, stable base as he moves through the volley, and his hips remain relatively square to the net with only a small rotation as he steps into the shot.
|
|
2.1s |
BH Volley · Court-level-side #5
Taylor Dent's backhand volley from the net area on the deuce side, filmed from a court-level side angle. His hips stay relatively square to the net with a pronounced knee bend, showing a strong, forward-driving leg push through the volley.
|
|
3.6s |
BH Volley · Court-level-side #6
Taylor Dent's backhand volley from the forehand side, filmed from a court-level side angle. His feet set in a slightly closed stance with a small adjustment step just before contact, followed by a short recovery step toward the center of the court.
|
|
1.9s |
BH Volley · Court-level-side #7
Taylor Dent's backhand volley from the net area, filmed from a court-level side angle. His shoulders stay relatively square to the net with only a slight trunk rotation, making the stroke more of a compact blocking action driven by a short forward shoulder and trunk move.
|
|
2.3s |
BH Volley · Front #1
Taylor Dent's backhand volley from the center of the court, filmed from the front. His compact split step into a slightly open stance is followed by a short adjustment step that positions his front foot diagonally toward the net for stability through contact.
|
|
2.9s |
BH Volley · Front #2
Taylor Dent's backhand volley from the center of the court, filmed from the front. His continental grip is clearly visible, with a firm but relaxed wrist that stays stable through contact rather than breaking or flicking.
|
|
2s |
BH Volley · Front #3
Taylor Dent's backhand volley from the front, filmed from a front court-level angle. At contact his racket face is slightly open with the ball meeting the strings around waist height, and the compact punch stroke sends the racket head moving directly through the line of the ball.
|
|
2.5s |
BH Volley · Front #4
Taylor Dent's backhand volley from the front of the court, filmed from a front angle. His compact split step transitions quickly into a short lateral adjustment and a stable neutral stance as he moves through the volley.
|
|
2.2s |
BH Volley · Front #5
Taylor Dent's backhand volley from the center of the court, filmed from the front. After contact his racquet finishes slightly in front with the non-hitting hand counterbalancing behind him as he quickly regains a compact ready position.
|
|
2.3s |
BH Volley · Front #6
Taylor Dent's backhand volley from the center of the court, filmed from the front. His shoulders stay relatively square to the net with only a modest trunk rotation, and the uncoiling is short and compact, matching the abbreviated swing path typical of a volley.
|
|
3.6s |
BH Volley · Rear #1
Taylor Dent's backhand volley from the center of the court, filmed from a rear angle. His racket face stays slightly open at contact with the ball meeting the strings around waist height, and the compact forward punch keeps the racket head moving directly through the target line.
|
|
2.1s |
BH Volley · Rear #2
Taylor Dent's backhand volley from the center of the court, filmed from a rear angle. After contact his racquet finishes out in front while his weight continues moving toward the net, and his non-hitting hand quickly returns toward his torso as he prepares for the next shot.
|
|
2.1s |
BH Volley · Side
Taylor Dent's backhand volley from the net area, filmed from the side. His hips stay relatively square to the net while a noticeable knee bend and forward leg drive support a stable, compact volley.
|
|
8.8s |
BH Volley · Side #0001
Taylor Dent's backhand volley from the net on the deuce side, filmed from the side. His continental grip is firm with minimal grip change and the wrist stays relatively firm with only a slight flexion through contact.
|
|
8.8s |
BH Volley · Side #0001
Taylor Dent's backhand volley from the side, filmed from a side angle. His follow-through finishes slightly in front with the racquet head stable as his weight moves through the court and his non-hitting hand helps him quickly return to a ready position.
|
|
9.1s |
BH Volley · Side #0001
Taylor Dent's backhand volley from the net on the deuce side, filmed from the side. His weight transfers forward into the court as his non-hitting hand stays back to counterbalance, helping him quickly recover toward a ready position after the volley.
|
|
7.1s |
BH Volley · Side #0001
Taylor Dent's backhand volley from the side, filmed from a side angle. His forward weight transfer into the court continues through the follow-through, with the non-hitting hand staying back to help him quickly recover toward a ready position.
|
|
11.2s |
BH Volley · Side #0001
Taylor Dent's backhand volley from the net on the deuce side, filmed from the side. His compact split-step leads into a short lateral adjustment and a stable neutral stance as he moves through the volley with minimal upper-body rotation.
|
|
7.2s |
BH Volley · Side #0001
Taylor Dent's backhand volley from the side, filmed from a side camera angle. His shoulders stay relatively square with a compact trunk rotation, with a brief, subtle coil and quick uncoil that links the shoulder turn directly to the forward movement of the racquet.
|
|
9.2s |
BH Volley · Side #0001
Taylor Dent's backhand volley from the net on the deuce side, filmed from the side. The racket face is slightly open at contact with the ball meeting the strings just in front of his front hip at about waist height.
|
|
8.8s |
BH Volley · Side #0001
Taylor Dent's backhand volley from the side, filmed from a side angle. His knees stay flexed with a short, compact step through, and his hips remain relatively closed as the legs drive slightly forward through contact.
|
|
8.5s |
BH Volley · Side #0001
Taylor Dent's backhand volley from the side, filmed from the side angle. His compact split step into a short forward lunge keeps a stable, slightly open stance as he meets the ball in front of his body.
|
|
7.9s |
BH Volley · Side #001
Taylor Dent's backhand volley from the net area, filmed from the side. The high-speed side view makes it clear that his racket face stays slightly open at contact with the ball meeting the strings just in front of his body and around waist height.
|
|
7.9s |
BH Volley · Side #0001
Taylor Dent's backhand volley from the side, filmed from a side angle. His shoulders stay relatively square with only a modest trunk coil, and you can clearly see the upper body rotate as a unit with minimal independent shoulder turn during the forward swing.
|
|
13.8s |
BH Volley · Side #0001
Taylor Dent's backhand volley from the net area, filmed from the side. His compact split step into a short forward lunge keeps a stable, slightly open stance as he meets the ball in front of his body.
|
|
5.7s |
BH Volley · Side #0001
Taylor Dent's backhand volley from the side, filmed from a side angle. His shoulders stay relatively square to the net while the trunk makes a compact forward rotation, clearly showing the brief but sequenced uncoil from legs through hips to shoulders into the contact.
|
|
8.1s |
BH Volley · Side #1
Taylor Dent's backhand volley from the net area, filmed from the side. His one-handed follow-through finishes in front of his body with the non-hitting hand counterbalancing behind him as he quickly regains a compact ready position.
|
|
2.2s |
BH Volley · Side #2
Taylor Dent's backhand volley from the net area, filmed from the side. His footwork features a small adjustment hop into a firm neutral stance with a clear front-foot step through toward the ball before contact.
|
|
3.5s |
BH Volley · Side #3
Taylor Dent's backhand volley from the side, filmed from a side angle. After contact his racquet finishes slightly in front with the non-hitting hand counterbalancing behind him, and he quickly brings both hands toward a compact ready position as his weight moves forward into the court.
|
|
4.3s |
BH Volley · Side #4
Taylor Dent's backhand volley from the net area on the deuce side, filmed from the side. His continental grip is clearly visible, with a firm but relaxed wrist that stays stable through contact without excessive wrist flick.
|
|
3.7s |
BH Volley · Side #5
Taylor Dent's backhand volley from the net area, filmed from the side. His hips stay relatively square to the net while his knees stay flexed, with a short forward leg drive that supports a compact, stable volley motion.
|
|
2.3s |
BH Volley · Side #6
Taylor Dent's backhand volley from the side, filmed from a side angle. His upper-body rotation is minimal, with the trunk staying relatively square as the hitting-side shoulder slightly leads the motion, making the shoulder and trunk work more as a stable wall than a coiling segment in the kinetic chain.
|
|
2.5s |
BH Volley · Side #7
Taylor Dent's backhand volley from the net on the deuce side, filmed from the side. The racket face is slightly open at contact with the ball meeting the strings just in front of his body at about waist height, and the racket head moves forward on a compact, punching path.
|
|
1.9s |
First Serve · Ad · Arm-action · Court-level-front #1
Taylor Dent's first serve from the Ad court, filmed from a court-level front angle. At contact his racket face is slightly tilted forward with the ball struck just above full extension, and the arm action drives the racket head steeply up and through the ball for maximum speed.
|
|
4.3s |
First Serve · Ad · Body-rotation · Court-level-front #1
Taylor Dent's first serve from the ad court, filmed from a court-level front angle. His shoulders load with a pronounced upper-body coil before uncoiling in sequence with the trunk rotation, making the chest clearly rotate from facing the side fence toward the net at contact.
|
|
3.9s |
First Serve · Ad · Court-level-front #1
Taylor Dent's first serve from the Ad court, filmed from a court-level front angle. His hips stay closed through the knee bend and then drive explosively upward as his legs extend into the court.
|
|
3.9s |
First Serve · Ad · Court-level-front #2
Taylor Dent's first serve from the Ad court, filmed from a court-level front angle. After contact his momentum drives into the court with a pronounced forward weight transfer, and his non-hitting arm tucks in as he lands balanced and ready for the next ball.
|
|
3.5s |
First Serve Down The Middle · Ad · Court-level-front #1
Taylor Dent's first serve from the Ad court down the middle, filmed from a court-level front angle. The contact point is high above his head with the racket face slightly pronated forward, and the racket head accelerates steeply upward through the ball on a fast, upward swing path.
|
|
3.4s |
First Serve Down The Middle · Ad · Court-level-front #001
Taylor Dent's first serve from the ad side down the middle, filmed from a court-level front angle. His deep knee bend and strong upward leg drive are clearly visible, with the hips uncoiling aggressively toward the target as he leaves the ground.
|
|
3.4s |
First Serve Wide · Ad · Court-level-front #1
Taylor Dent's first serve from the Ad court, hit wide and filmed from a court-level front angle. His deep knee bend and explosive upward leg drive into the court are clearly visible, with the hips powerfully uncoiling toward the target as he extends off the ground.
|
|
3.8s |
First Serve Wide · Ad · Court-level-front #001
Taylor Dent's first serve from the Ad side out wide, filmed from a court-level front angle. His feet set in a platform stance with a pronounced knee bend, and you can see a strong drive up through his legs into the court with a clear front-leg landing that carries him slightly toward the Ad alley.
|
|
3.8s |
First Serve Wide · Ad · Court-level-front #2
Taylor Dent's first serve from the Ad court, hit wide, filmed from a court-level front angle. His deep knee bend and strong leg drive upward are clearly visible, with the hips uncoiling as he pushes off the ground into the serve.
|
|
5.2s |
First Serve Wide · Ad · Court-level-front #001
Taylor Dent's first serve from the Ad court, hit wide, filmed from a court-level front angle. His shoulders load with a pronounced upper-body coil against the hips before uncoiling in sequence, making the trunk rotation and shoulder-over-shoulder action easy to see from the front.
|
|
5.2s |
First Serve · Deuce · Arm-action · Court-level-front #1
Taylor Dent's first serve from the deuce court, filmed from a court-level front angle. His compact stance sets up a strong leg drive, and you can see a pronounced front-foot pivot as he lands and begins his recovery.
|
|
3s |
First Serve · Deuce · Arm-action · Court-level-front #2
Taylor Dent's first serve from the deuce court, filmed from a court-level front angle. His follow-through carries his hitting arm down across his body while his weight lands on his front foot, quickly bringing both hands back toward a compact ready position for the next shot.
|
|
3.3s |
First Serve → BH Volley · Deuce · Court-level-front #1
Taylor Dent's backhand volley from the deuce side, filmed from a court-level front angle. His hips stay relatively square to the net while his knees stay flexed, with a short forward leg drive off the outside leg as he moves through the volley.
|
|
5.6s |
First Serve → BH Volley → FH Volley · Deuce · Court-level-front #1
Taylor Dent's forehand volley from the deuce court, filmed from a court-level front angle. From this angle you can see his continental grip stay firm with minimal grip change and a stable wrist, creating a solid, slightly open racquet face through contact.
|
|
8s |
First Serve · Deuce · Court-level-front #1
Taylor Dent's first serve from the deuce court, filmed from a court-level front angle. The racket face is slightly closed at a contact point just above head height, with the racket head accelerating steeply upward along the right side of his body.
|
|
4.7s |
First Serve · Deuce · Court-level-front #2
Taylor Dent's first serve from the deuce court, filmed from a court-level front angle. His continental grip is firm with a relaxed wrist that pronates aggressively through contact, making the wrist snap especially clear from this angle.
|
|
3.7s |
First Serve · Deuce · Court-level-front #3
Taylor Dent's first serve from the deuce side, filmed from a court-level front angle. His continental grip is firm with a relaxed wrist that pronates aggressively through contact, creating a distinct wrist snap just after impact.
|
|
3.9s |
First Serve Down The Middle · Deuce · Court-level-front #1
Taylor Dent's first serve from the deuce court, filmed from a court-level front angle. His continental grip is firm with a slightly relaxed wrist, allowing clear pronation through contact as the wrist snaps subtly toward the target down the middle.
|
|
3.7s |
First Serve Down The Middle · Deuce · Court-level-front #001
Taylor Dent's first serve from the deuce side, filmed from a front court-level angle. The racket face is slightly pronated at contact with the ball struck just above head height, and the racket head accelerates steeply upward along the target line down the middle.
|
|
3.7s |
First Serve Down The Middle · Deuce · Court-level-front #2
Taylor Dent's first serve from the deuce side down the middle, filmed from a court-level front angle. At contact his racket face is nearly vertical with the ball struck slightly in front of his body at full extension, and the upward swing path produces pronounced racket head speed through the hitting zone.
|
|
3.3s |
First Serve Down The Middle · Deuce · Court-level-front #001
Taylor Dent's first serve from the deuce court, filmed from a court-level front angle. His feet stay grounded in a pinpoint stance before driving up into the ball, with a small adjustment step of the back foot inward to align his body straight through the target line.
|
|
3.3s |
First Serve → FH Volley → OH · Deuce · Court-level-front #2
Taylor Dent's forehand volley from the deuce court, filmed from a court-level front angle. His strong knee bend and forward-driving right leg are clearly visible as he pushes off toward the net, keeping his hips square to the incoming ball.
|
|
10.5s |
First Serve · Deuce · Leg-action · Court-level-front #1
Taylor Dent's first serve from the deuce court, filmed from a court-level front angle. His deep knee bend and explosive upward leg drive are clearly visible as his hips extend vertically into the ball.
|
|
3.8s |
First Serve · Deuce · Toss · Court-level-front #1
Taylor Dent's first serve from the deuce court, filmed from a court level front angle. At contact his racket face is slightly tilted forward with the ball struck just above head height, and the racket head accelerates steeply upward along the right side of his body.
|
|
3.7s |
First Serve Wide · Deuce · Court-level-front #1
Taylor Dent's first serve wide from the deuce court, filmed from a court-level front angle. The racket face is slightly closed at a contact point just above head height, with the racket head accelerating steeply upward along the right side of his body.
|
|
3.7s |
First Serve Wide · Deuce · Court-level-front #001
Taylor Dent's first serve wide from the Deuce side, filmed from a court-level front angle. His deep knee bend and aggressive leg drive into the court are clearly visible, with his hips powerfully uncoiling upward as he extends into the serve.
|
|
3.7s |
First Serve → FH Volley → BH Volley → BH → OH → BH Volley · Deuce · Court-level-front #1
Taylor Dent's forehand volley from the front of the court, filmed from a court-level front angle. His compact split step into a slightly open stance and short adjustment steps toward the net are clearly visible before he plants and volleys.
|
|
11.2s |
First Serve → FH Volley → OH · Deuce · Court-level-front #1
Taylor Dent's forehand volley from the center of the court, filmed from a court-level front angle. His continental grip is firm with a slightly open racket face, and his wrist stays relatively firm with minimal hinge through contact to keep the volley compact and controlled.
|
|
9.6s |
First Serve → BH Half Volley → FH Volley · Ad · Court-level-rear #1
Taylor Dent's forehand volley from the ad side, filmed from a court-level rear angle. After contact he drives his weight forward into the court and quickly brings both hands back toward a compact ready position for the next shot.
|
|
9.3s |
First Serve · Ad · Court-level-rear #1
Taylor Dent's first serve from the Ad court, filmed from a court-level rear angle. The contact is made at a high point well above his head with the racket face slightly pronated, and the racket head accelerates steeply upward and into the court along an aggressive swing path.
|
|
3.6s |
First Serve Down The Middle · Ad · Court-level-rear #1
Taylor Dent's first serve from the Ad side down the middle, filmed from a court-level rear angle. His shoulders turn well past perpendicular to the baseline, creating a pronounced trunk coil that uncoils explosively in sequence from hips to shoulders into the contact.
|
|
3.9s |
First Serve Down The Middle · Ad · Court-level-rear #001
Taylor Dent's first serve from the Ad side down the middle, filmed from a court-level rear angle. His deep knee bend and strong leg drive upward are clearly visible, with the hips uncoiling toward the target as he pushes off the ground.
|
|
3.9s |
First Serve · Ad · Leg-action · Court-level-rear #1
Taylor Dent's first serve from the Ad court, filmed from a court-level rear angle. His deep knee bend and strong upward leg drive are clearly visible, with the hips uncoiling toward the target as the back leg extends through contact.
|
|
3.6s |
First Serve · Ad · Leg-action · Court-level-rear #2
Taylor Dent's first serve from the Ad court, filmed from a court-level rear angle. After contact he lands on his front foot with his back leg kicking up behind him, then quickly regathers his feet into a balanced stance to be ready for the next shot.
|
|
3.7s |
First Serve Wide · Ad · Court-level-rear #1
Taylor Dent's first serve from the Ad court, hit wide and filmed from a court-level rear angle. His footwork includes a pronounced platform stance with a strong knee bend, followed by a coordinated upward drive and a balanced landing well inside the court.
|
|
3.7s |
First Serve Wide · Ad · Court-level-rear #001
Taylor Dent's first serve from the Ad court, hit wide and filmed from a court-level rear angle. His footwork includes a rhythmic rocking motion into a pinpoint stance before driving up, with a pronounced back leg kick that lands him slightly inside the baseline for quick recovery.
|
|
3.7s |
First Serve · Deuce · Arm-action · Court-level-rear #1
Taylor Dent's first serve from the deuce side, filmed from a court-level rear angle. His hips stay relatively closed during the loading phase with a pronounced knee bend, then drive upward as the back leg straightens to push through the court.
|
|
3.9s |
First Serve · Deuce · Arm-action · Court-level-rear #2
Taylor Dent's first serve from the deuce side, filmed from a court-level rear angle. His continental grip is firm with a relaxed wrist that pronates aggressively through contact, creating a distinct wrist snap visible as the racquet accelerates up and out toward the target.
|
|
3.5s |
First Serve → BH Volley · Deuce · Court-level-rear #1
Taylor Dent's backhand volley from the deuce side, filmed from a court-level rear angle. His hips stay relatively square to the net while his knees stay flexed, giving him a stable, low base as he steps forward into the volley.
|
|
5.8s |
First Serve · Deuce · Leg-action · Court-level-rear #1
Taylor Dent's first serve from the deuce court, filmed from a court-level rear angle. His footwork shows a pronounced knee bend and leg drive into the court, with his back foot sliding up beside the front foot before landing on his left leg inside the baseline.
|
|
3.8s |
First Serve Wide · Deuce · Court-level-rear #1
Taylor Dent's first serve from the deuce side out wide, filmed from a court-level rear angle. His footwork includes a pronounced platform stance with a deep knee bend and a strong upward drive off both legs into the court before landing on his front (left) foot.
|
|
3.5s |
First Serve Wide · Deuce · Court-level-rear #001
Taylor Dent's first serve from the deuce court hit wide, filmed from a court-level rear angle. His follow-through carries his racket across his body as he lands inside the court and quickly brings both hands back toward a ready position for the next shot.
|
|
3.5s |
First Serve → BH Volley · Ad · Court-level-side #1
Taylor Dent's backhand volley from the ad side, filmed from a court-level side angle. His feet set in a neutral stance with a small adjustment step before contact, followed by a quick crossover recovery step back toward the center.
|
|
5.9s |
First Serve → BH Volley · Ad · Court-level-side #2
Taylor Dent's backhand volley from the Ad side, filmed from a court-level side angle. The side view makes it easy to see his slightly open racket face at contact with the ball meeting the strings just in front of his front hip on a relatively compact swing path.
|
|
5.6s |
First Serve → BH Volley → OH · Ad · Court-level-side #1
Taylor Dent's backhand volley from the Ad side, filmed from a court-level side angle. His initial split-step into a slightly closed stance is followed by a short lateral adjustment and a compact step through the volley with his outside leg.
|
|
8.7s |
First Serve → FH Half Volley · Ad · Court-level-side #1
Taylor Dent's first serve from the Ad side, filmed from a court-level side angle. His shoulders load with a pronounced upper-body coil against the hips before uncoiling in sequence, making the trunk rotation and shoulder-over-shoulder action easy to distinguish through contact.
|
|
5.9s |
First Serve → FH Volley · Ad · Court-level-side #1
Taylor Dent's forehand volley from the Ad side, filmed from a court-level side angle. The racket face is slightly open at contact with the ball taken just in front of his body and around chest height, creating a compact forward punch with minimal backswing.
|
|
5.6s |
First Serve → OH · Ad · Court-level-side #1
Taylor Dent's first serve from the Ad court, filmed from a court-level side angle. His shoulders load with a pronounced upper-body coil against the hips before uncoiling in sync with trunk rotation, making the degree of shoulder-over-shoulder action in the trophy phase very clear from this view.
|
|
7.2s |
First Serve · Ad · Toss · Court-level-side #1
Taylor Dent's first serve from the Ad court, filmed from a court-level side angle. His continental grip is clearly visible, with a loose wrist that pronates aggressively through contact to accelerate the racquet head.
|
|
4.2s |
First Serve · Ad · Toss · Court-level-side #2
Taylor Dent's first serve from the ad side, filmed from a court-level side angle. His shoulders coil deeply away from the court, with a pronounced upper–lower body separation that uncoils in sequence from the trunk through the hitting shoulder into contact.
|
|
3.6s |
First Serve · Ad · Toss · Court-level-side #3
Taylor Dent's first serve from the ad side, filmed from a court-level side angle. His deep knee bend and strong leg drive into the court are clearly visible, with his hips powerfully uncoiling upward as he extends to contact.
|
|
3.9s |
First Serve → BH Volley · Deuce · Court-level-side #1
Taylor Dent's backhand volley from the deuce side, filmed from a court-level side angle. At contact his racket face is slightly open with the ball meeting the strings just in front of his body, and the compact punchy swing path keeps the racket head traveling almost straight through the line of the shot.
|
|
7.5s |
First Serve → FH Volley → OH · Deuce · Court-level-side #1
Taylor Dent's forehand volley from the deuce side, filmed from a court-level side angle. His hips stay relatively square to the net while his knees stay flexed, showing a strong, stable leg base as he steps forward through the volley.
|
|
9.1s |
First Serve · Deuce · Leg-action · Court-level-side #1
Taylor Dent's first serve from the deuce court, filmed from a court-level side angle. His shoulder line turns well past perpendicular to the baseline as his trunk coils over the back hip, then uncoils in sync with his leg drive to initiate an upward kinetic chain into the serve.
|
|
3.9s |
First Serve · Deuce · Leg-action · Court-level-side #2
Taylor Dent's first serve from the deuce court, filmed from a court-level side angle. His follow-through carries his back leg forward into the court, with his weight landing on his front foot before he quickly regathers into a balanced ready position.
|
|
3.2s |
First Serve → OH → FH Volley · Deuce · Court-level-side #1
Taylor Dent's forehand volley from the deuce court, filmed from a court-level side angle. His footwork shows a quick adjustment step into the volley with a slightly closed stance, followed by a small recovery step back toward the center of the court.
|
|
8.5s |
First Serve · Deuce · Toss · Court-level-side #1
Taylor Dent's first serve from the deuce side, filmed from a court-level side angle. His follow-through carries his hitting arm across his body as his weight lands on his front foot, with his non-hitting hand dropping back as he quickly begins to recover toward a ready position.
|
|
3.7s |
First Serve → FH Volley · Ad · Front · 125fps
Player's first serve from the ad side, filmed from the front. The hips stay relatively closed through the loading phase with a deep knee bend, then drive upward as the back leg extends into the court.
|
125 |
4.7s |
First Serve → FH Volley · Deuce · Front · 125fps
Player's first serve from the deuce side, filmed from the front. The slow-motion view makes the shoulder over-rotation and subsequent trunk uncoil especially clear as the torso unwinds sequentially from hips to shoulders into the serve.
|
125 |
4.4s |
First Serve → BH Half Volley → OH · Ad · Front #1
Taylor Dent's first serve from the ad court, filmed from the front. After contact he drives up into the court, bringing his non-hitting arm down and forward as he lands on his front leg and quickly prepares his racquet hand for a potential overhead or volley.
|
|
10.2s |
First Serve → BH Volley → BH → OH · Ad · Front #1
Taylor Dent's backhand volley from the Ad side, filmed from the front. The racket face is slightly open at contact with the ball meeting the strings around waist height in front of his body, and the compact punchy swing path keeps the racket head moving directly through the contact line.
|
|
8.6s |
First Serve → BH Volley · Ad · Front #1
Taylor Dent's backhand volley from the Ad court, filmed from the front. His hips stay relatively square to the net while his knees are softly flexed, giving a stable base as he steps into the volley with a clear weight transfer from back leg to front leg.
|
|
7.3s |
First Serve Down The Middle · Ad · Front #1
Taylor Dent's first serve from the Ad court down the middle, filmed from the front. His continental grip is clearly visible with a firm but relaxed hand, and the front view makes the upward wrist pronation into contact easy to see.
|
|
3.9s |
First Serve Down The Middle · Ad · Front #001
Taylor Dent's first serve from the Ad court down the middle, filmed from the front. After contact his momentum carries him into the court with his tossing arm dropping quickly as he lands on his front foot and begins to square his shoulders into a ready position.
|
|
3.9s |
First Serve → FH Volley · Ad · Front #1
Taylor Dent's forehand volley from the Ad court, filmed from the front. His continental grip is clearly visible, with a firm but relaxed wrist that stays stable through contact without excessive wrist snap.
|
|
5.1s |
First Serve · Ad · Front #1
Taylor Dent's first serve from the Ad court, filmed from the front. The racket face can be seen pronating aggressively through contact with the ball struck slightly above head height, creating a steep upward swing path and high racket head speed.
|
|
4s |
First Serve · Ad · Front #2
Taylor Dent's first serve from the Ad court, filmed from the front. His shoulders and trunk rotate deeply away from the target during the toss, then uncoil in a pronounced sequence where the torso unwinds ahead of the hitting arm to drive up into contact.
|
|
4.1s |
First Serve · Ad · Front #3
Taylor Dent's first serve from the ad side, filmed from the front. His footwork includes a pronounced forward step into the court from a platform stance, with a strong push off the back leg that drives his body weight toward the net.
|
|
3.6s |
First Serve · Ad · Front #4
Taylor Dent's first serve from the Ad court, filmed from the front. After contact his racquet finishes across his body while his back leg swings forward, helping him land inside the court and quickly stabilize into a balanced recovery stance.
|
|
3.7s |
First Serve · Ad · Toss · Front #1
Taylor Dent's first serve from the Ad side, filmed from the front. His continental grip is firm with a relaxed wrist that pronates aggressively through contact, creating a pronounced wrist snap just after impact.
|
|
3.6s |
First Serve · Ad · Toss · Front #2
Taylor Dent's first serve from the ad side, filmed from the front. His continental grip is firm with a relaxed wrist that pronates aggressively through contact, making the racket edge-on before snapping into the ball.
|
|
3.9s |
First Serve · Deuce · Arm-action · Front #2
Taylor Dent's first serve from the deuce court, filmed from the front. After contact his arm action unwinds fully with the hitting hand finishing low while his weight transfers into the court, bringing him quickly toward a compact ready position for the next shot.
|
|
3.6s |
First Serve → BH Volley → BH Volley · Deuce · Front #1
Taylor Dent's backhand volley from the deuce court, filmed from the front. His shoulders stay relatively square with a compact trunk rotation, with a subtle forward uncoil through contact that links his upper-body turn directly into the volley punch.
|
|
7.7s |
First Serve → BH Volley → FH Volley · Deuce · Front #1
Taylor Dent's forehand volley from the deuce court, filmed from the front. His split-step precedes a quick forward adjustment into a neutral stance, with a short recovery step preparing him to move for the next ball.
|
|
8.6s |
First Serve → BH Volley · Deuce · Front #1
Taylor Dent's backhand volley from the deuce side, filmed from the front. At contact his one-handed backhand racket face is slightly open with the ball meeting the strings around waist height, and the compact punch keeps the racket head moving straight through the line of the shot.
|
|
6.2s |
First Serve · Deuce · Body-rotation · Front #1
Taylor Dent's first serve from the deuce court, filmed from the front. From this angle you can clearly see his continental grip stay firm while his wrist pronates aggressively through contact to send the ball into the body.
|
|
3.5s |
First Serve · Deuce · Body-rotation · Front #2
Taylor Dent's first serve from the deuce side, filmed from the front. At contact his racket face is slightly tilted upward with the ball struck just above his fully extended tossing arm, and the racket head accelerates steeply up and across the ball.
|
|
3.4s |
First Serve Down The Middle · Deuce · Front #1
Taylor Dent's first serve from the deuce court, filmed from the front. His forward momentum into the court is clear as he drives off his back leg, landing inside the baseline with a strong front-leg plant that sets up quick recovery steps.
|
|
3.7s |
First Serve Down The Middle · Deuce · Front #001
Taylor Dent's first serve from the deuce court, filmed from the front. His footwork includes a pronounced front-leg drive into the court from a platform stance, followed by a small recovery hop that readies him for the next ball.
|
|
3.7s |
First Serve · Deuce · Front #1
Taylor Dent's first serve from the deuce court, filmed from the front. His deep knee bend and strong upward leg drive are clearly visible as his hips rise explosively into the ball.
|
|
3.3s |
First Serve · Deuce · Front #2
Taylor Dent's first serve from the deuce side, filmed from the front. His continental grip is firm with a slightly extended wrist, and you can clearly see the pronounced wrist pronation through contact as the racquet face snaps up and into the court.
|
|
3.7s |
First Serve · Deuce · Front #3
Taylor Dent's first serve from the deuce court, filmed from the front. His continental grip is clearly visible on the racquet handle, with a firm but relaxed wrist that pronates aggressively through contact to drive the serve.
|
|
3.4s |
First Serve · Deuce · Front #4
Taylor Dent's first serve from the deuce side, filmed from the front. He uses a balanced platform stance with a pronounced knee bend, then drives up and into the court with a clear front-leg push-off that leads directly into his landing and recovery steps.
|
|
2.8s |
First Serve · Deuce · Toss · Front #1
Taylor Dent's first serve from the deuce court, filmed from the front. His compact, forward-driving service motion features a small adjustment step with the front foot before knee bend, setting a stable base for an aggressive upward drive.
|
|
3.9s |
First Serve · Deuce · Toss · Front #2
Taylor Dent's first serve from the deuce court, filmed from the front. His tossing arm stays extended high as the ball reaches well above his outstretched racket, with the racket head dropping deeply behind his back before accelerating up into contact.
|
|
3.6s |
First Serve → BH Half Volley · Ad · Rear #3253
Taylor Dent's first serve from the Ad court, filmed from a rear angle. His follow-through carries his momentum slightly into the court with his non-hitting arm dropping back for counterbalance before he regroups into a stable ready position.
|
|
5.2s |
First Serve · Ad · Arm-action · Rear #1
Taylor Dent's first serve from the Ad side, filmed from a rear angle. His footwork features a pronounced platform stance with minimal foot movement during the toss, followed by an aggressive upward drive off both legs into the court.
|
|
3.7s |
First Serve · Ad · Arm-action · Rear #2
Taylor Dent's first serve from the ad side, filmed from a rear angle. His footwork features a pronounced platform stance with a deep knee bend and a strong upward drive off both legs before landing well inside the court on his front foot.
|
|
4s |
First Serve → BH Volley → FH Drop Volley · Ad · Rear #1
Taylor Dent's backhand volley from the ad side, filmed from a rear angle. From this view, his continental grip is evident with a firm but relaxed wrist that stays stable through contact, preventing any excessive wrist break on impact.
|
|
8.2s |
First Serve → BH Volley → FH Volley · Ad · Rear #1
Taylor Dent's forehand volley from the ad court, filmed from a rear angle. After contact he finishes with his racket hand slightly across his body while his weight moves forward into the court, quickly preparing his feet for the next shot at net.
|
|
8s |
First Serve → BH Volley · Ad · Rear #1
Taylor Dent's backhand volley from the Ad side, filmed from a rear angle. His initial split-step into a slightly open stance is followed by a quick adjustment step with his outside foot to get his body behind the ball before the volley.
|
|
6.2s |
First Serve · Ad · Body-rotation · Rear #1
Taylor Dent's first serve from the Ad court, filmed from a rear angle. At contact his racket face is nearly square to the ball with the contact point well above his head, and the racket head accelerates steeply upward along the right side of his body.
|
|
2.8s |
First Serve Down The Middle · Ad · Rear #1
Taylor Dent's first serve from the Ad court down the middle, filmed from a rear angle. His shoulders rotate deeply away from the target during the toss, creating a pronounced trunk coil that unwinds in sequence from hips to shoulders as he drives up to contact.
|
|
3.7s |
First Serve Down The Middle · Ad · Rear #001
Taylor Dent's first serve from the Ad side down the middle, filmed from a rear angle. His continental grip is clearly visible with a firm wrist that pronates aggressively through contact, creating a pronounced wrist snap up and across the ball.
|
|
3.7s |
First Serve → FH Volley · Ad · Rear #1
Taylor Dent's forehand volley from the ad side, filmed from a rear angle. His hips stay relatively square to the net while his legs show a noticeable split-step and short, driving push off the outside leg as he moves into the volley.
|
|
4.7s |
First Serve → FH Volley · Ad · Rear #2
Taylor Dent's forehand volley from the Ad side, filmed from a rear angle. After contact he drives his weight forward into the court and quickly brings both hands back toward a neutral ready position for the next shot.
|
|
5.4s |
First Serve · Ad · Leg-action · Rear #1
Taylor Dent's first serve from the Ad court, filmed from a rear angle. His deep knee bend and explosive upward leg drive are clearly visible, with the hips uncoiling toward the target as his back leg kicks back for full extension.
|
|
3.8s |
First Serve · Ad · Rear #1
Taylor Dent's first serve from the Ad court, filmed from a rear angle. His shoulders rotate deeply away from the court during the toss, creating a pronounced trunk coil that then uncoils in sequence from hips to shoulders into contact.
|
|
3.8s |
First Serve · Ad · Rear #2
Taylor Dent's first serve from the Ad court, filmed from a rear angle. His shoulders rotate well past perpendicular to the baseline on the trophy phase, creating a pronounced trunk coil that uncoils sequentially from hips to shoulders as he drives up to contact.
|
|
4s |
First Serve · Ad · Rear #4
Taylor Dent's first serve from the Ad court, filmed from a rear angle. His footwork includes a pronounced front-foot pivot into a platform stance, with a clear weight transfer from back to front leg during the service motion.
|
|
3.8s |
First Serve · Ad · Toss · Rear #1
Taylor Dent's first serve from the Ad court, filmed from a rear angle. His continental grip is firm with a relaxed wrist that pronates aggressively through contact, making the wrist snap especially evident from this view.
|
|
4.5s |
First Serve · Deuce · Arm-action · Rear #1
Taylor Dent's first serve from the deuce court, filmed from a rear angle. The rear view makes the upward racket path and slightly closed racket face at contact easy to see as he strikes the ball at full extension above his head.
|
|
3.2s |
First Serve → BH Volley · Deuce · Rear #1
Taylor Dent's backhand volley from the deuce side, filmed from a rear angle. His hips stay relatively closed to the net while his legs show a firm, staggered base with a noticeable front-knee bend as he moves through the volley.
|
|
7.1s |
First Serve → BH Volley · Deuce · Rear #1
Taylor Dent's backhand volley from the deuce side, filmed from a rear angle. From this view his compact split step into a slightly open stance is clear, followed by a short crossover recovery step back toward the center after contact.
|
|
5.8s |
First Serve → BH Volley · Deuce · Rear #2
Taylor Dent's backhand volley from the deuce court, filmed from a rear angle. His shoulders stay relatively closed with a compact trunk rotation, and the rear view makes it easy to see the brief coil then quick uncoil of his torso initiating the volley through the kinetic chain.
|
|
7.4s |
First Serve → BH Volley · Deuce · Rear #3
Taylor Dent's backhand volley from the deuce side, filmed from a rear angle. His one-handed backhand volley contact is made slightly in front of his body with a firm, slightly open racket face and a compact punch through the ball.
|
|
5.6s |
First Serve Down The Middle · Deuce · Rear #1
Taylor Dent's first serve from the deuce court, filmed from the rear. After contact his follow-through finishes across his body as his weight drives into the court, and he quickly brings both hands back toward a compact ready position for the next shot.
|
|
4s |
First Serve Down The Middle · Deuce · Rear #001
Taylor Dent's first serve from the deuce court, filmed from a rear angle. After contact his follow-through finishes across his body as his weight lands on his front foot, and he quickly brings both hands back toward a compact ready position for the next shot.
|
|
4s |
First Serve → FH Volley · Deuce · Rear #1
Taylor Dent's forehand volley from the deuce court, filmed from a rear angle. From this view his quick adjustment steps into the ball and slightly closed stance toward the net are clearly visible as he moves forward to volley.
|
|
7.7s |
First Serve → FH Volley · Deuce · Rear #2
Taylor Dent's forehand volley from the deuce court, filmed from a rear angle. After contact he finishes with the racquet head high and slightly across his body while his weight moves forward into the court, quickly resetting his feet for the next shot.
|
|
5.6s |
First Serve · Deuce · Leg-action · Rear #1
Taylor Dent's first serve from the deuce side, filmed from the rear. From this angle you can see his wrist stay relaxed through the trophy position, then pronate aggressively through contact as his hand drives up and over the ball.
|
|
4s |
First Serve · Deuce · Rear #1
Taylor Dent's first serve from the deuce side, filmed from a rear angle. At contact his racket face is slightly tilted upward with the ball struck just above full extension, and the racket head accelerates steeply up and across the ball along a pronounced pronation-driven swing path.
|
|
3.6s |
First Serve · Deuce · Rear #2
Taylor Dent's first serve from the deuce court, filmed from a rear angle. His compact, rhythmic footwork into the serve includes a clear pinpoint stance as his back foot draws up to the front before leg drive.
|
|
4.1s |
First Serve · Deuce · Rear #3
Taylor Dent's first serve from the deuce court, filmed from a rear angle. After contact he drives his weight into the court and quickly brings his non-hitting arm back in toward his torso as he lands, helping him square up into a compact ready position for the next shot.
|
|
4s |
First Serve · Deuce · Rear #4
Taylor Dent's first serve from the deuce side, filmed from a rear angle. His deep knee bend and strong upward leg drive are clearly visible as his hips uncoil toward the court before contact.
|
|
2.9s |
First Serve · Deuce · Toss · Rear #1
Taylor Dent's first serve from the deuce court, filmed from a rear angle. His compact stance and rhythmic pre-serve rocking motion are clearly visible before he drives up into the ball with a strong front-leg push.
|
|
3.9s |
First Serve · Deuce · Toss · Rear #2
Taylor Dent's first serve from the deuce side, filmed from a rear angle. His shoulder line turns significantly away from the court during the toss phase, creating a pronounced trunk coil that then unwinds sequentially from the hips through the shoulders into the serving arm.
|
|
3.7s |
First Serve Wide · Deuce · Rear #1
Taylor Dent's first serve from the deuce court, hit wide and filmed from a rear angle. His shoulders load with a pronounced upper-body coil relative to the hips, then uncoil aggressively through contact with the tossing shoulder staying high to drive trunk rotation up and into the court.
|
|
3.6s |
First Serve Wide · Deuce · Rear #001
Taylor Dent's first serve from the deuce court, hit wide and filmed from a rear angle. After contact he lets his hitting arm finish across his body while his back leg swings forward into the court, helping him land balanced and ready for the next shot.
|
|
3.6s |
First Serve Wide · Deuce · Rear #2
Taylor Dent's first serve from the deuce court, hit wide and filmed from the rear. His follow-through finishes across his body with his weight driving into the court, and he quickly lands on his front foot to start recovering toward a ready position.
|
|
3.8s |
First Serve Wide · Deuce · Rear #001
Taylor Dent's first serve from the deuce court out wide, filmed from a rear angle. At contact his racket face is slightly tilted forward with the ball struck just above head height, and the upward swing path produces pronounced racket head speed through the hitting zone.
|
|
3.8s |
First Serve · Ad · Toss · Rear #2
Taylor Dent's first serve from the Ad court, filmed from a rear angle. His feet set in a platform stance with a pronounced knee bend, and you can see his back foot driving up and into the court as he lands well inside the baseline for an aggressive recovery position.
|
|
6.1s |
First Serve → BH Volley · Ad · Side #1
Taylor Dent's backhand volley from the Ad side, filmed from a side angle. The video clearly shows the racket face slightly open at contact with the ball taken just in front of his body and around waist height, with a compact forward punch through the shot.
|
|
5.2s |
First Serve → BH Volley · Ad · Side #1
Taylor Dent's backhand volley from the Ad court, filmed from a side angle. After contact his racquet finishes slightly in front with the non-hitting hand counterbalancing behind him, and he quickly regains a compact ready position with his weight moving forward into the court.
|
|
4.9s |
First Serve → BH Volley · Ad · Side #2
Taylor Dent's backhand volley from the Ad side, filmed from a side angle. His strong knee flex and forward-driving rear hip are clearly visible as he steps through the volley, using his legs to move his weight through the shot.
|
|
4.7s |
First Serve · Ad · Body-rotation · Side #1
Taylor Dent's first serve from the Ad court, filmed from the side. After contact his torso continues rotating into the court with his back leg swinging forward, bringing him down into a balanced landing that sets up his recovery.
|
|
3.9s |
First Serve · Ad · Body-rotation · Side #2
Taylor Dent's first serve from the Ad court, filmed from the side. His continental grip is firm with a slightly laid-back wrist, and you can see clear wrist pronation through contact as the racquet accelerates up and across the ball.
|
|
2.9s |
First Serve → FH · Ad · Side #1
Taylor Dent's first serve from the Ad court, filmed from the side. At contact his racket face is slightly tilted forward with the ball struck just above head height, and the racket head accelerates steeply upward along the right side of his body.
|
|
6.1s |
First Serve → FH Half Volley · Ad · Side #2
Taylor Dent's first serve from the Ad court, filmed from the side. His continental grip is firm with a relaxed wrist that pronates aggressively through contact, making the racket head whip up and across the ball.
|
|
5.8s |
First Serve → FH Volley → BH Volley · Ad · Side #1
Taylor Dent's forehand volley from the Ad side, filmed from a side angle. His shoulders stay relatively square to the net with minimal trunk rotation, so the kinetic chain is driven more by a compact shoulder punch and forward weight transfer than by a large coil and uncoil of the torso.
|
|
8.7s |
First Serve → FH Volley · Ad · Side #1
Taylor Dent's forehand volley from the ad side, filmed from a side angle. His continental grip is clearly visible, with a firm but relaxed wrist that stays stable through contact without excess wrist snap.
|
|
5.2s |
First Serve → FH Volley · Ad · Side #2
Taylor Dent's forehand volley from the ad side, filmed from a side angle. His shoulders stay slightly closed as the trunk rotates forward in a compact uncoil, with the chest driving through the contact line rather than relying on excessive arm swing.
|
|
6.5s |
First Serve · Ad · Side #1
Taylor Dent's first serve from the Ad side, filmed from the side. His footwork includes a pronounced platform stance with a deep knee bend and a strong forward drive off the back leg into the court.
|
|
6.9s |
First Serve · Ad · Side #2
Taylor Dent's first serve from the Ad side, filmed from the side. After contact he drives his weight into the court with a long pronated follow-through and quickly brings his non-hitting hand back in front of his body as he lands in a balanced ready position.
|
|
3.1s |
First Serve · Ad · Side #3
Taylor Dent's first serve from the Ad side, filmed from the side. His shoulders turn well past perpendicular to the baseline, creating a pronounced trunk coil that uncoils in sync with his leg drive and upward racquet motion.
|
|
2.9s |
First Serve · Ad · Side #4
Taylor Dent's first serve from the Ad side, filmed from the side. At contact his racket face is slightly tilted upward with the ball struck well above head height, and the racket head accelerates steeply up and across the ball along a pronounced upward swing path.
|
|
4.1s |
First Serve · Ad · Side #5
Taylor Dent's first serve from the Ad side, filmed from the side. His deep knee bend and aggressive forward leg drive into the court are clearly visible as his hips uncoil upward through the hitting phase.
|
|
3.8s |
First Serve · Ad · Toss · Side #1
Taylor Dent's first serve from the ad court, filmed from the side. His follow-through carries his body weight into the court with his non-hitting arm dropping back for counterbalance before he lands in a stable, ready position.
|
|
3.8s |
First Serve · Ad · Toss · Side #2
Taylor Dent's first serve from the Ad court, filmed from a side angle. His deep knee bend and aggressive leg drive into the court are clearly visible, with his hips powerfully uncoiling upward as he extends to contact.
|
|
3.3s |
First Serve → BH Half Volley · Deuce · Side #1
Taylor Dent's first serve from the deuce court, filmed from a side angle. His continental grip is clearly visible, with a relaxed wrist that pronates aggressively through contact to snap the racquet face up and through the ball.
|
|
5.4s |
First Serve → BH Volley · Deuce · Side #2
Taylor Dent's backhand volley from the deuce court, filmed from a side angle. His shoulders stay slightly closed with a compact trunk rotation, then uncoil just enough through contact so the hitting arm and torso move together as a single unit toward the target.
|
|
8.1s |
First Serve → BH Volley · Deuce · Side #3
Taylor Dent's backhand volley from the deuce court, filmed from the side. After contact his racquet finishes out in front as he steps through the court, with his non-hitting hand staying back to help his shoulders square quickly into a ready position for the next shot.
|
|
7.2s |
First Serve → BH Volley · Deuce · Side #4
Taylor Dent's backhand volley from the deuce side, filmed from a side angle. His continental grip is firm with a slightly laid-back wrist, staying stable through contact with only a minimal, controlled wrist snap to guide the ball.
|
|
4.9s |
First Serve → BH Volley · Deuce · Side #5
Taylor Dent's backhand volley from the deuce side, filmed from a side angle. His shoulders stay slightly closed with a compact trunk rotation, and you can see a short, efficient uncoil of the torso initiating just before the arm extends through contact.
|
|
5.4s |
First Serve · Deuce · Body-rotation · Side #1
Taylor Dent's first serve from the deuce court, filmed from the side. His follow-through drives his torso and back leg into the court, finishing with his non-hitting arm dropping back as he quickly regains a balanced, ready position.
|
|
3.7s |
First Serve · Deuce · Side #1
Taylor Dent's first serve from the deuce court, filmed from the side. After contact he drives his weight into the court and lands on his front leg, with his non-hitting arm dropping back as he quickly begins to recover toward a ready position.
|
|
2.8s |
First Serve · Deuce · Side #2
Taylor Dent's first serve from the deuce side, filmed from the side. His continental grip is firm with a noticeable relaxed wrist that pronates aggressively through contact, making the wrist snap clearly visible from this angle.
|
|
3.1s |
First Serve · Deuce · Toss · Side #1
Taylor Dent's first serve from the deuce court, filmed from the side. His deep knee bend and strong leg drive upward are clearly visible as his hips extend and push through toward the court during the toss and launch phase.
|
|
4.5s |
First Serve · Deuce · Toss · Side #2
Taylor Dent's first serve from the deuce court, filmed from the side. His deep knee bend and strong upward leg drive are clearly visible as his hips extend explosively into the court during the serve motion.
|
|
2.9s |
FH Center · Court-level-front · Neutral
Taylor Dent's forehand from the center of the court in a neutral stance, filmed from a court-level front angle. His hips stay relatively closed at the start with a noticeable knee bend, then unwind as his legs drive upward and forward into the court during the swing.
|
|
2.8s |
FH Center · Court-level-front · Open #1
Taylor Dent's forehand from the center of the court in an open stance, filmed from a front court-level angle. His contact point is well in front of his body with the racket face slightly closed, and the racket head accelerates steeply upward through the ball for heavy topspin.
|
|
2.8s |
FH Center · Court-level-front · Open #2
Taylor Dent's forehand from the center of the court in an open stance, filmed from a court-level front angle. His shoulders load with a pronounced upper-body coil relative to the hips, then uncoil aggressively as the trunk rotates through contact, making the sequencing of torso rotation into the forward swing easy to see.
|
|
2.8s |
FH Inside Out · Court-level-front #1
Taylor Dent's forehand InsideOut from the center of the court, filmed from a court_level front angle. His shoulders load with a pronounced upper-body coil relative to the hips, then uncoil in sequence as the trunk rotates aggressively toward the target before contact.
|
|
3.2s |
FH Inside Out · Court-level-front #2
Taylor Dent's inside-out forehand from the center of the court, filmed from a front court-level angle. His hips stay closed through the loading phase with a pronounced knee bend, then drive forward as his legs extend explosively into the shot.
|
|
3.3s |
FH Moves Back · Court-level-front #2
Taylor Dent's forehand while moving back from a central baseline position, filmed from a front court-level angle. His follow-through wraps high over his shoulder with his non-hitting hand retracting toward his body as he quickly resets his feet into a neutral ready position.
|
|
2.9s |
FH Running · Court-level-front
Taylor Dent's running forehand from the center of the court, filmed from a court-level front angle. His quick adjustment steps into an open stance and the pronounced cross-over recovery step back toward the middle are clearly visible from this angle.
|
|
2.6s |
FH Short · Court-level-front
Taylor Dent's forehand from the center of the court, filmed from a court-level front angle. His semi-western grip is evident with the racket hand positioned well under the handle, and there is a pronounced wrist lag that releases into a firm, stable wrist at contact.
|
|
3.2s |
FH Center · Court-level-side · Open #1
Taylor Dent's forehand from the center of the court in an open stance, filmed from a court-level side angle. His shoulders rotate well past perpendicular to the net on the unit turn, then his trunk uncoils ahead of the arm swing, showing clear separation between hip and shoulder rotation.
|
|
2.7s |
FH Center · Court-level-side · Open #2
Taylor Dent's forehand from the center of the court in an open stance, filmed from a court-level side angle. His feet load with a wide base in the open stance as he plants the outside leg, then performs a strong pivot and recovery step that readies him to move forward or laterally after contact.
|
|
2.8s |
FH Center · Court-level-side · Open #3
Taylor Dent's forehand from the center of the court in an open stance, filmed from a court-level side angle. His feet set wide in a stable open stance with a pronounced load on the outside leg before he rotates through and takes a couple of small recovery steps along the baseline.
|
|
2.6s |
FH Center · Court-level-side · Open #4
Taylor Dent's forehand from the center of the court in an open stance, filmed from a court-level side angle. After contact his follow-through finishes high across his body while his weight continues moving into the court, and he quickly brings both hands back toward a ready position.
|
|
2.5s |
FH Drop Volley · Court-level-side
Taylor Dent's forehand drop volley from the net area, filmed from a court-level side angle. His compact follow-through keeps the racquet head soft in front while his weight stays slightly forward, allowing him to recover quickly into a ready position close to the net.
|
|
4s |
FH Half Volley · Court-level-side #1
Taylor Dent's forehand from the half-volley position, filmed from a court-level side angle. His follow-through finishes around shoulder height while his weight continues moving forward into the court, setting him up quickly for the next shot.
|
|
2s |
FH Half Volley · Court-level-side #2
Taylor Dent's forehand half-volley from the baseline area, filmed from a court-level side angle. His shoulders stay relatively closed at contact with a compact trunk rotation, making the short coil and quick uncoil of his torso easy to distinguish in relation to his hips.
|
|
2.2s |
FH Inside In · Court-level-side #1
Taylor Dent's forehand Inside-In from the Deuce court, filmed from a court-level side angle. His hips stay closed through the load with a deep knee bend, then drive forward aggressively as his legs extend into the court during the forward swing.
|
|
2.9s |
FH Inside In · Court-level-side #2
Taylor Dent's forehand Inside-In from the Deuce side, filmed from a court-level side angle. His shoulders turn well past perpendicular to the net before uncoiling, with the trunk unwinding ahead of the arm to drive the kinetic chain forward through contact.
|
|
2.9s |
FH Running · Court-level-side #1
Taylor Dent's running forehand from the deuce side, filmed from a court-level side angle. His hips stay relatively closed as he sprints, with a pronounced bend in the outside knee before pushing off the ground into contact.
|
|
2.6s |
FH Running · Court-level-side #2
Taylor Dent's running forehand from the deuce side, filmed from a court-level side angle. His shoulders coil well past perpendicular to the net before contact, then uncoil in sequence with his hips, making the trunk rotation and timing of his upper-body release easy to distinguish.
|
|
2.6s |
FH Running · Court-level-side #3
Taylor Dent's running forehand from the deuce side, filmed from a court-level side angle. His follow-through finishes high across his body while his weight continues moving forward into the court, quickly bringing his non-hitting hand back to center as he recovers toward a ready position.
|
|
2.8s |
FH Running · Court-level-side #4
Taylor Dent's running forehand from the deuce side, filmed from a court-level side angle. At contact his racket face is slightly closed with the ball struck around waist height, and the racket head accelerates steeply upward along a low-to-high swing path.
|
|
3s |
FH Short · Court-level-side #1
Taylor Dent's forehand from the short court, filmed from a court-level side angle. His shoulders load with a pronounced turn relative to his hips, then his trunk uncoils in a clearly sequenced motion from pelvis to ribcage to shoulder as he drives through the ball.
|
|
2.6s |
FH Short · Court-level-side #2
Taylor Dent's forehand from the short court, filmed from a court-level side angle. The racket face is slightly closed at a contact point around waist height, with the racket head accelerating steeply upward along a low-to-high swing path.
|
|
2.3s |
FH Short · Court-level-side #3
Taylor Dent's forehand from the center of the court, filmed from a court-level side angle. After contact his follow-through wraps high across his body while his weight continues moving into the court, and he quickly resets his feet into a ready position for the next shot.
|
|
4s |
FH Wide · Court-level-side #1
Taylor Dent's forehand from the deuce court, filmed from a court-level side angle. At contact his racket face is slightly closed with the ball struck around waist height, and the swing path moves steeply upward, producing visible racket head acceleration through the hitting zone.
|
|
2.8s |
FH Wide · Court-level-side #2
Taylor Dent's forehand from a wide position on the court, filmed from a court-level side angle. His footwork includes a quick adjustment step out toward the sideline into an open stance, followed by a pronounced recovery step back toward the center after contact.
|
|
2.8s |
FH Wide · Court-level-side · Open #1
Taylor Dent's forehand from the Deuce side, filmed from a court-level side angle. His open stance is clear as he plants his outside foot wide, then uses a small recovery shuffle to start moving back toward the center after contact.
|
|
2.8s |
FH Wide · Court-level-side · Open #2
Taylor Dent's wide forehand from an open stance, filmed from a court-level side angle. The racket face is slightly closed at a contact point around waist to chest height, with the racket head accelerating upward and forward along a low-to-high swing path.
|
|
2.8s |
FH Wide · Court-level-side · Open #3
Taylor Dent's forehand from the deuce side, filmed from a court level side angle. After contact he allows the racquet to wrap fully across his body while his weight continues moving toward the center of the court, bringing his non-hitting hand back up into a ready position for the next shot.
|
|
3.2s |
FH Wide · Court-level-side · Open #4
Taylor Dent's forehand from the deuce side, filmed from a court-level side angle. From this view his semi-western grip is clear, with a pronounced wrist lag on the forward swing that releases into a firm, stable wrist at contact on the wide ball.
|
|
2.9s |
FH Wide · Court-level-side · Open #5
Taylor Dent's wide forehand from the deuce side in an open stance, filmed from a court-level side angle. His shoulders rotate well past perpendicular to the net on the unit turn, then his trunk uncoils ahead of the arm swing, with the chest finishing fully rotated toward the target.
|
|
2.8s |
FH Short → FH Volley · Front · Open · 125fps
Taylor Dent's forehand from a central position in an open stance, filmed from the front at 125 fps slow motion. His hips stay relatively open toward the net while a strong knee bend and upward leg drive are clearly visible as he pushes off the ground into the forward swing.
|
125 |
4.1s |
FH Center · Front · Open
Taylor Dent's forehand from the center of the court in an open stance, filmed from the front. His semi-western grip is evident with the racket hand positioned slightly under the handle, and there is a clear wrist lag that unloads into a firm, stable wrist at contact.
|
|
2.6s |
FH Center · Front · Open #1
Taylor Dent's forehand from the center of the court in an open stance, filmed from the front. His follow-through wraps high across his body while his weight transfers onto his front leg, quickly bringing both hands back in front to re-establish a ready position.
|
|
2.4s |
FH Center · Front · Open #2
Taylor Dent's forehand from the center of the court in an open stance, filmed from the front. From this angle, his semi-western grip pairs with a pronounced wrist lag on the takeback that unwinds into a firm, stable wrist at contact.
|
|
2.4s |
FH Running · Front
Taylor Dent's running forehand from the center of the court, filmed from the front. His shoulders rotate as a unit with the trunk, with a pronounced coil on the unit turn and a visibly sharp uncoiling sequence that starts from the hips and trunk before the racket accelerates through contact.
|
|
2.3s |
FH Short · Front
Taylor Dent's forehand from the center of the court, filmed from the front. His feet set up in a strong neutral stance with a clear split-step into a short adjustment hop before driving forward into the shot.
|
|
3.8s |
FH Wide · Front · Open
Taylor Dent's forehand from a wide ball in an open stance, filmed from the front. His semi-western grip is evident in the way the racket face is slightly closed at address, and there is a pronounced wrist lag that unwinds into a strong pronation through contact.
|
|
2.8s |
FH Center · Rear · Neutral
Taylor Dent's forehand from the center of the court in a neutral stance, filmed from the rear. His follow-through finishes high across his body while his weight transfers forward, and he quickly brings both hands back toward the racket to reset into a ready position.
|
|
2.5s |
FH Center · Rear · Open #1
Taylor Dent's forehand from the center of the court in an open stance, filmed from a rear angle. His contact point is well in front of his body with the racket face slightly closed, and the swing path accelerates steeply upward, indicating heavy topspin.
|
|
2.4s |
FH Center · Rear · Open #2
Taylor Dent's forehand from the center of the court in an open stance, filmed from a rear angle. From this view, his semi-western grip is evident in the pronounced wrist lag on the takeback that unwinds into a strong pronation through contact.
|
|
2.6s |
FH Center · Rear · Open #3
Taylor Dent's forehand from the center of the court in an open stance, filmed from a rear angle. His hips stay relatively closed during the loading phase before driving through with strong leg push-off, with a noticeable knee bend on the right leg setting up the upward rotation.
|
|
3.5s |
FH Drop Volley · Rear
Taylor Dent's forehand drop shot from a central court position, filmed from a rear angle. His compact adjustment steps bring him quickly up to the ball, setting into a slightly open stance before contact to control the soft touch.
|
|
2s |
FH Half Volley · Rear
Taylor Dent's forehand from the middle of the court, filmed from the rear. His footwork features a quick split-step into a wide base and a mostly neutral stance, followed by small adjustment steps that set up an aggressive weight transfer into the shot.
|
|
2.1s |
FH · Rear #1
Taylor Dent's running forehand from the center of the court, filmed from a rear angle. His hips stay relatively closed as he chases wide, with a pronounced knee bend and strong push-off from the outside leg to drive through the shot.
|
|
2.2s |
FH Running · Rear #2
Taylor Dent's running forehand from a neutral court position, filmed from the rear. His semi-western grip is evident with pronounced wrist lag on the forward swing that releases into a strong pronation through contact.
|
|
3.9s |
FH Wide · Rear · Open
Taylor Dent's forehand from the center of the baseline, filmed from a rear angle. His open stance shows strong external hip rotation with a deep right-knee bend loading into the outside leg before driving laterally into the wide ball.
|
|
2.6s |
FH Drop Volley · Side #0001
Taylor Dent's forehand drop volley from the net, filmed from the side. His continental grip is clearly visible with a relatively firm wrist, using minimal wrist snap at contact to softly cushion the ball.
|
|
13.1s |
FH Running · Side #1
Taylor Dent's running forehand from the deuce side, filmed from the side. His semi-western grip is evident in the closed racket face on the takeback, with noticeable wrist lag maintained until just before contact.
|
|
2.6s |
FH Running · Side #2
Taylor Dent's running forehand from the deuce side, filmed from a side angle. His racket meets the ball slightly in front of his body with a closed racket face and a steep low-to-high swing path that accelerates the racket head through contact.
|
|
1.9s |
FH Running · Side #3
Taylor Dent's running forehand from the side, filmed from a side angle. His footwork features quick accelerating steps into the ball followed by a semi-open stance, with a pronounced recovery step continuing his momentum forward after contact.
|
|
3.6s |
FH Lob · Side
Taylor Dent's forehand topspin lob from the center of the court, filmed from the side. His hips load with a noticeable knee bend before uncoiling upward, and his rear leg drives up and through the shot to lift the ball with heavy topspin.
|
|
2.6s |
FH Volley · Court-level-front #1
Taylor Dent's forehand volley from the center of the court, filmed from a court-level front angle. His continental grip is clearly visible with a firm but relaxed wrist, staying stable through contact with minimal wrist flick.
|
|
2.2s |
FH Volley · Court-level-front #2
Taylor Dent's forehand volley from the net area, filmed from a court-level front angle. He uses a compact split-step followed by a short jab step toward the ball, setting up a stable neutral stance as he punches through the volley.
|
|
2.6s |
FH Volley · Court-level-front #3
Taylor Dent's forehand volley from the center of the court, filmed from a court-level front angle. His knees stay flexed with a pronounced forward weight shift from back leg to front leg, while his hips remain relatively square to the net to support a stable blocking motion.
|
|
2s |
FH Volley · Court-level-rear #1
Taylor Dent's forehand volley from a central net position, filmed from a court-level rear angle. The contact is made well out in front of his body with a slightly open racket face and a compact forward punch, keeping the racket head stable through impact.
|
|
1.7s |
FH Volley · Court-level-rear #2
Taylor Dent's forehand volley from the center of the court, filmed from a court-level rear angle. His hips stay relatively square to the net while his knees maintain a slight bend, with a short forward leg drive stepping into the volley.
|
|
3.5s |
FH Volley · Court-level-side #1
Taylor Dent's forehand volley from the net on the deuce side, filmed from a court-level side angle. His shoulders stay relatively square to the net with only a modest trunk coil, and the side view makes the quick, compact uncoil of his torso into contact easy to distinguish from the arm-driven portion of the stroke.
|
|
3.3s |
FH Volley · Court-level-side #2
Taylor Dent's forehand volley from the net area on the deuce side, filmed from a court level side angle. After contact his racquet finishes slightly in front of his body as he steps through with his front foot and quickly brings both hands back toward a compact ready position.
|
|
2.1s |
FH Volley · Court-level-side #3
Taylor Dent's forehand volley from the net area on the deuce side, filmed from a court-level side angle. His follow-through finishes slightly across his body as he steps through the volley, quickly bringing his non-hitting hand back to the racquet throat to recover into a compact ready position.
|
|
2.4s |
FH Volley · Court-level-side #4
Taylor Dent's forehand volley from the net area, filmed from a court-level side angle. His hips stay relatively square to the net while his knees maintain a slight bend, showing a firm base with minimal leg drive as he steps into the volley.
|
|
2s |
FH Volley · Court-level-side #5
Taylor Dent's forehand volley from the net on the deuce side, filmed from a court-level side angle. His knees stay flexed with a strong forward lunge from the right leg, keeping the hips low and stable as he moves through the volley.
|
|
2s |
FH Volley · Front #1
Taylor Dent's forehand volley from the center of the court, filmed from a front angle. At contact his racket face is slightly open with the ball meeting the strings just in front of his lead shoulder, and the compact punch keeps the racket head moving directly through the target line.
|
|
1.9s |
FH Volley · Front #2
Taylor Dent's forehand volley from the center of the court, filmed from the front. His shoulders stay relatively square to the net with only a mild trunk rotation, and you can clearly see the brief, compact uncoil of the torso leading the arm through contact.
|
|
2.8s |
FH Volley · Front #3
Taylor Dent's forehand volley from the net area, filmed from a front angle. His shoulders stay relatively square to the net with only a modest trunk rotation, and you can see a compact uncoil through contact driven more by a short shoulder punch than by full torso coil.
|
|
2.1s |
FH Volley · Rear #1
Taylor Dent's forehand volley from the center of the court, filmed from a rear angle. His continental grip is firm with minimal grip change and his wrist stays relatively firm through contact with only a slight forward snap to direct the volley.
|
|
2s |
FH Volley · Rear #2
Taylor Dent's forehand volley from the center of the court, filmed from a rear angle. At contact his racket face is slightly open with the ball met in front of his body at about chest height, and the compact forward punch keeps the racket head moving straight through the line of the shot.
|
|
1.9s |
FH Volley · Rear #3
Taylor Dent's forehand volley from the center of the court, filmed from a rear angle. His continental grip is clearly visible with a firm but relaxed wrist, staying stable through contact with minimal wrist flick.
|
|
2s |
FH Volley · Rear #4
Taylor Dent's forehand volley from the center of the court, filmed from a rear angle. His hips stay relatively square to the net while his knees remain flexed, giving him a stable, low base as he steps forward into the volley.
|
|
3.9s |
FH Volley · Rear #5
Taylor Dent's forehand volley from the center of the court, filmed from a rear angle. His shoulders stay relatively square to the net with only a modest trunk rotation, and the torso uncoils minimally as the hitting arm extends through the volley.
|
|
2s |
FH Volley · Side #1
Taylor Dent's forehand volley from the side, filmed from a side camera angle. The racket face is slightly open at contact with the ball struck just in front of his lead shoulder, and the compact swing path keeps the racket head moving directly through the contact zone.
|
|
7.5s |
FH Volley · Side #2
Taylor Dent's forehand volley from the side, filmed from a side angle. His continental grip is firm with a slightly laid-back wrist that stays stable through contact, with minimal wrist snap on the punch.
|
|
8.2s |
Forehand-volley
Taylor Dent's forehand volley from the forecourt, filmed from the side. The racket face stays slightly open at contact with the ball meeting the strings just in front of his lead hip at about waist height, and the swing path is compact with minimal follow-through.
|
|
3.5s |
FH Volley · Side #0001
Taylor Dent's forehand volley from the net area, filmed from the side. His shoulders stay relatively square to the net while the trunk rotates just enough to support a compact forward punch, with minimal coil and an early chest opening toward the target.
|
|
7.5s |
FH Volley · Side #0001
Taylor Dent's forehand volley from the deuce side, filmed from the side. His shoulders stay relatively square with a compact trunk rotation, with a brief, tight coil and quick uncoil that links directly into the forward step and contact.
|
|
8.2s |
FH Volley · Side #1
Taylor Dent's forehand volley from the net on the deuce side, filmed from a side angle. His continental grip is clearly visible with a firm but relaxed wrist, staying stable through contact with only a slight forward hinge to guide the ball.
|
|
2.9s |
FH Volley · Side #2
Taylor Dent's forehand volley from the net area, filmed from the side. After contact his racquet finishes slightly in front as his weight moves through the court and he quickly begins to square his shoulders into a ready position for the next shot.
|
|
2.3s |
FH Volley · Side #3
Taylor Dent's forehand volley from the net area, filmed from the side. His footwork features a quick adjustment step into a neutral stance with a clear forward weight transfer off the back leg toward the net.
|
|
2.1s |
FH Volley · Side #4
Taylor Dent's forehand volley from the net area, filmed from the side. His footwork features a small adjustment hop into a neutral stance followed by a clear step-through with the front foot toward the ball as he makes contact.
|
|
1.9s |
FH Volley · Side #5
Taylor Dent's forehand volley from the net area, filmed from the side. The side view makes it easy to see his slightly open racket face at contact with the ball struck just in front of his body and around waist height.
|
|
4s |
FH Volley · Side #6
Taylor Dent's forehand volley from the net area, filmed from the side. His continental grip is clearly visible with a firm but relaxed wrist, staying stable through contact with only a slight forward flex rather than an active wrist snap.
|
|
2s |
BH → OH · Court-level-front
Taylor Dent's overhead from the center of the court, filmed from a court-level front angle. His continental grip is clearly visible, with a firm wrist set that stays laid back through the trophy position before snapping through contact.
|
|
2.9s |
OH · Court-level-front
Taylor Dent's overhead from the center of the court, filmed from a court-level front angle. After contact his weight drives forward into the court and he quickly brings the racquet down while his non-hitting hand helps him square up into a ready position.
|
|
3.9s |
OH · Court-level-side #1
Taylor Dent's overhead from the center of the court, filmed from a court-level side angle. His racket is fully extended above his head at contact with a slightly closed face, and the contact point is clearly higher than his outstretched tossing arm.
|
|
3s |
OH · Court-level-side #2
Taylor Dent's overhead from the center of the court, filmed from a court-level side angle. His hips stay relatively closed as he loads, with a deep knee bend and strong upward leg drive clearly visible from this side view.
|
|
2.5s |
BH → OH · Front
Taylor Dent's overhead from the center of the court, filmed from the front. At contact his racket face is slightly closed with the contact point well above his head, and the racket head drives steeply down through the ball for a decisive downward strike.
|
|
2.9s |
OH · Front
Taylor Dent's overhead from the center of the court, filmed from the front. His continental grip is clearly visible with a firm but relaxed hand, and there is a pronounced wrist snap upward through contact to drive the ball down.
|
|
5.4s |
BH → OH · Side
Taylor Dent's overhead from the center of the court, filmed from the side. His hips stay closed as he loads with a pronounced knee bend, then drive upward with strong leg extension before contact.
|
|
2.8s |
OH · Side
Taylor Dent's overhead from the center of the court, filmed from the side. His shoulders rotate as a single unit with the trunk, with a pronounced upper-body tilt and clear sequencing from trunk uncoil into the upward arm swing.
|
|
3.2s |
BH Return Slice 2nd Serve · Ad · Court-level-front #1
Taylor Dent's second serve return backhand slice from the Ad side, filmed from a court-level front angle. His early split step into a neutral stance leads into a small adjustment step with his outside foot before carving the slice and taking a couple of quick recovery steps back toward the center.
|
|
3.4s |
BH Return Slice 2nd Serve · Ad · Court-level-front #2
Taylor Dent's second serve from the Ad side, filmed from a court-level front angle. His legs show a deep knee bend during the loading phase, with a strong upward leg drive that extends through contact and keeps his hips driving into the court.
|
|
2.8s |
BH Return Slice 2nd Serve · Ad · Court-level-front #3
Taylor Dent's second serve from the Ad court, filmed from a court-level front angle. After contact he lands balanced with his weight moving into the court, his non-hitting hand dropping naturally as he quickly regathers into a compact ready position for the backhand slice return.
|
|
3.1s |
BH Return Slice 2nd Serve · Deuce · Court-level-front #2
Taylor Dent's second serve from the deuce side, filmed from a court-level front angle. His continental grip is clearly visible, with a firm but relaxed hand position that allows for pronounced wrist pronation through contact.
|
|
2.6s |
BH Slice → Return 1st Serve · Deuce · Court-level-front #1
Taylor Dent's first serve from the deuce court, filmed from a court-level front angle. His continental grip is firm with a relaxed wrist that pronates aggressively through contact, making the wrist snap especially visible from this angle.
|
|
2.7s |
BH Slice → Return 1st Serve · Deuce · Court-level-front #2
Taylor Dent's first serve return from the deuce court, filmed from a court-level front angle. His compact split step into a slightly open stance sets up a quick weight transfer onto his front foot as he prepares the one-handed backhand slice.
|
|
2.7s |
FH Return 1st Serve · Deuce · Court-level-front #1
Taylor Dent's first serve from the deuce court, filmed from a court-level front angle. His shoulders load with a pronounced upper-body coil against the hips before uncoiling in a synchronized sequence that drives the trunk up and into the court through contact.
|
|
3s |
FH Return Slice 1st Serve · Ad · Court-level-front #1
Taylor Dent's first serve from the Ad side, filmed from a front court-level angle. His deep knee bend and strong upward leg drive are clearly visible as his hips uncoil toward the court during the serve.
|
|
3.4s |
FH Return Slice 1st Serve · Ad · Court-level-front #2
Taylor Dent's first serve from the Ad court, filmed from a court-level front angle. The contact point shows his racket face slightly tilted forward at full extension above his head, with noticeable racket head speed as it whips up and across the ball.
|
|
2.8s |
FH Return Slice 1st Serve · Ad · Court-level-front #3
Taylor Dent's first serve from the Ad side, filmed from a front court-level angle. After contact he drives his weight into the court, with his non-hitting arm dropping back for balance before he lands and begins recovering toward a ready position.
|
|
2.6s |
FH Return Slice 1st Serve · Deuce · Court-level-front #1
Taylor Dent's first serve from the deuce court, filmed from a court level front angle. After contact, his weight drives into the court with his back leg kicking up behind him as he lands balanced and begins to square his shoulders into a ready position for the next shot.
|
|
3.4s |
FH Return Slice 1st Serve · Deuce · Court-level-front #2
Taylor Dent's first serve from the deuce court, filmed from court level in front. His continental grip is clearly visible on the racquet handle, with a firm but relaxed wrist that pronates aggressively through contact.
|
|
3.2s |
FH Return 2nd Serve · Ad · Court-level-rear #2
Taylor Dent's second serve from the Ad side, filmed from a court-level rear angle. After contact, his follow-through finishes across his body with his weight driving into the court, quickly bringing his non-hitting hand back to center as he recovers toward a ready position.
|
|
3.5s |
FH Return 2nd Serve · Ad · Court-level-rear #2
Taylor Dent's second serve from the Ad court, filmed from a court-level rear angle. His shoulders and trunk coil strongly away from the target during the toss, then uncoil in sequence so the torso rotation clearly leads the arm swing into contact.
|
|
3.5s |
BH Return Slice 1st Serve · Ad · Court-level-side #1
Taylor Dent's first serve return slice from the Ad side, filmed from a court-level side angle. His split-step is timed just before the opponent’s contact, followed by a small lateral adjustment and a slightly open stance as he leans into the sliced backhand return.
|
|
3.3s |
BH Return Slice 1st Serve · Ad · Court-level-side #2
Taylor Dent's first serve from the Ad side, filmed from a court-level side angle. His hips load deeply with a pronounced knee bend before driving upward, showing strong leg drive and hip extension into the serve.
|
|
3.2s |
BH Return Slice 1st Serve · Ad · Court-level-side #3
Taylor Dent's first serve from the Ad court, filmed from a court-level side angle. His continental grip is evident with a firm but relaxed wrist that pronates aggressively through contact, creating a distinct snap just after impact.
|
|
3.2s |
BH Return Slice 1st Serve · Deuce · Court-level-side #1
Taylor Dent's first serve from the deuce court, filmed from a court level side angle. His deep knee bend and strong upward leg drive into the court are clearly visible, with his hips powerfully uncoiling as he pushes off the ground.
|
|
4s |
BH Return Slice 1st Serve · Deuce · Court-level-side #2
Taylor Dent's first serve from the deuce court, filmed from a court-level side angle. After contact he drives his weight into the court with his back leg kicking up behind him, then quickly drops into a balanced ready position with his non-hitting hand coming back toward his center line.
|
|
3.3s |
BH Return Slice 1st Serve · Deuce · Court-level-side #3
Taylor Dent's first serve from the deuce court, filmed from a court-level side angle. His continental grip is firm with a slightly relaxed wrist that pronates aggressively through contact, creating a distinct wrist snap just after impact.
|
|
2.6s |
BH Return Slice 1st Serve · Deuce · Court-level-side #4
Taylor Dent's first serve from the deuce court, filmed from a court-level side angle. At contact, his racket face is slightly tilted forward with the ball struck just above full extension, and the racket head whips up and across his body on a pronounced upward swing path.
|
|
2.7s |
BH Return Slice 2nd Serve · Ad · Court-level-side #1
Taylor Dent's second serve from the Ad court, filmed from a court-level side angle. The side view makes it easy to see his racket drop into a deep backscratch position before driving up to contact at full extension slightly above head height, with the strings angled for strong topspin.
|
|
3.6s |
BH Return Slice 2nd Serve · Deuce · Court-level-side #2
Taylor Dent's second serve return backhand slice from the deuce court, filmed from a court-level side angle. The racket face is slightly open at contact with the ball struck around waist height, and the one-handed slice motion carves down the back of the ball with a compact, driving swing path.
|
|
2.7s |
BH Slice → Return 1st Serve · Ad · Court-level-side #4
Taylor Dent's first serve from the Ad court, filmed from a court-level side angle. At contact his racket face is slightly tilted forward with the ball struck high above his head, and the upward whip of the racket head is clearly visible as it accelerates through the ball.
|
|
2.8s |
BH Slice → Return 1st Serve · Ad · Court-level-side #5
Taylor Dent's first serve return from the Ad court, filmed from a court-level side angle. His shoulders and trunk show an early unit turn with a noticeable upper-body coil that uncoils rapidly into contact, with the shoulder line clearly rotating ahead of the hips in the kinetic chain.
|
|
3.1s |
BH Slice → Return 2nd Serve · Ad · Court-level-side #1
Taylor Dent's second serve from the Ad side, filmed from a court-level side angle. His deep knee bend and strong upward leg drive into the court are clearly visible, with his hips uncoiling vertically to transfer energy through the serve.
|
|
2.9s |
BH Slice → Return 2nd Serve · Ad · Court-level-side #2
Taylor Dent's second serve from the Ad side, filmed from a court-level side angle. His continental grip is clearly visible with a firm but relaxed hand, and the side view makes the wrist pronation through contact easy to see as the racquet accelerates up and across the ball.
|
|
2.6s |
BH Slice → Return 2nd Serve · Ad · Court-level-side #3
Taylor Dent's second serve return backhand slice from the Ad court, filmed from a court-level side angle. His footwork includes a small adjustment step into a neutral stance with a compact split-step just before contact, making the lateral movement and weight transfer easy to see from the side.
|
|
4s |
BH Slice → Return 2nd Serve · Deuce · Court-level-side #1
Taylor Dent's second serve from the deuce side, filmed from a court-level side angle. His legs load with a deep knee bend before driving upward, and his hips extend into the court as he lands inside the baseline.
|
|
2.7s |
BH Slice → Return 2nd Serve · Deuce · Court-level-side #2
Taylor Dent's second serve return backhand slice from the deuce court, filmed from a court-level side angle. After contact he extends the racquet out toward the target while his non-hitting arm counterbalances behind him, then he quickly brings both hands back toward his center to recover into a ready position.
|
|
2.3s |
FH Return 1st Serve · Deuce · Court-level-side #1
Taylor Dent's first serve from the deuce court, filmed from a court-level side angle. His continental grip is firm with a slightly laid-back wrist during the trophy position, moving into pronounced wrist pronation through contact.
|
|
3.5s |
FH Return Slice 1st Serve · Ad · Court-level-side #1
Taylor Dent's first serve from the Ad side, filmed from a court-level side angle. At contact his racket face is slightly tilted forward with the ball struck just above full extension, and the side view makes the upward, pronation-driven swing path and high racket head speed very clear.
|
|
2.4s |
FH Return Slice 1st Serve · Ad · Court-level-side #2
Taylor Dent's first serve from the Ad side, filmed from a court-level side angle. His continental grip is firm with a slightly extended wrist, and you can clearly see pronounced wrist pronation through contact into the follow-through.
|
|
3s |
FH Return Slice 2nd Serve · Ad · Court-level-side #1
Taylor Dent's second serve from the Ad side, filmed from a court-level side angle. The racket contacts the ball slightly above shoulder height with a clearly closed racket face, and the upward swing path and racket head acceleration into contact are easy to see from this side view.
|
|
2.2s |
FH Return Slice 2nd Serve · Ad · Court-level-side #2
Taylor Dent's second serve from the Ad side, filmed from a court-level side angle. His shoulder line turns significantly away from the net before the toss, with a pronounced trunk coil that uncoils in sync with his upward leg drive into the serve.
|
|
2.6s |
FH Return Slice 2nd Serve · Deuce · Court-level-side #1
Taylor Dent's second serve from the deuce court, filmed from a court-level side angle. After contact he lets his hitting arm finish across his body while his back leg swings forward into the court, helping him land balanced and ready for the next shot.
|
|
2.4s |
FH Return Slice 2nd Serve · Deuce · Court-level-side #2
Taylor Dent's second serve from the deuce side, filmed from a court-level side angle. His continental grip is firm with a relaxed wrist that pronates aggressively through contact, creating a pronounced wrist snap after the ball leaves the strings.
|
|
3.7s |
FH Return Slice 2nd Serve · Deuce · Court-level-side #001
Taylor Dent's second serve from the deuce court, filmed from a court-level side angle. His footwork includes a compact pinpoint stance with a clear knee bend and upward drive off both legs before landing slightly inside the baseline to initiate his recovery.
|
|
3.8s |
FH Return Slice 2nd Serve · Deuce · Court-level-side #002
Taylor Dent's second serve from the deuce court, filmed from a court-level side angle. His deep knee bend before the upward drive is clearly visible, with strong leg extension propelling him up into the ball.
|
|
3.7s |
FH Return Slice 2nd Serve · Deuce · Court-level-side #4
Taylor Dent's second serve from the deuce court, filmed from a court-level side angle. His deep knee bend and strong upward leg drive into the court are clearly visible, with the hips uncoiling as the back leg extends through contact.
|
|
0.1s |
BH Return Slice 2nd Serve → FH Drop Volley · Deuce · Front · 125fps
Taylor Dent's second serve return backhand slice from the deuce court, followed by a forehand drop volley, filmed from the front. His compact split-step into a neutral stance on the return transitions into quick forward adjustment steps that set up a stable base for the forehand drop volley at the net.
|
125 |
6.1s |
BH Slice → Return 1st Serve · Deuce · Front #2
Taylor Dent's first serve from the deuce side, filmed from the front. At contact the racket face is slightly tilted upward with the ball struck just above head height, and the racket head drives up and through the ball on a steep, fast swing path.
|
|
2.3s |
BH Return 2nd Serve · Ad · Front #2
Taylor Dent's backhand return of a second serve from the ad court, filmed from the front. His small adjustment steps into a neutral stance and a compact split-step just before the opponent’s contact are clearly visible from this angle.
|
|
2.6s |
BH Return 2nd Serve · Deuce · Front #1
Taylor Dent's second serve from the deuce court, filmed from the front. His shoulder line turns slightly away from the target before contact, with a noticeable but compact trunk coil that uncoils upward as the hitting shoulder drives over the tossing shoulder.
|
|
3.9s |
BH Return 2nd Serve · Deuce · Front #2
Taylor Dent's second serve from the deuce court, filmed from the front. His continental grip is clearly visible, with a firm but relaxed hand and a pronounced wrist pronation as he drives up and through the ball.
|
|
3.4s |
BH Return Slice 1st Serve · Ad · Front #1
Taylor Dent's first serve from the Ad court, filmed from the front. His shoulders rotate as a single unit with the trunk, with a pronounced upper-body coil during the trophy phase that uncoils aggressively into contact, making the sequencing of shoulder-over-hip rotation easy to see.
|
|
2.4s |
BH Return Slice 1st Serve · Ad · Front #2
Taylor Dent's first serve from the Ad side, filmed from the front. At contact his racket face is slightly tilted forward with the ball struck just above head height, and the upward swing path produces noticeable racket head speed through the hitting zone.
|
|
2.2s |
BH Return Slice 1st Serve · Deuce · Front #1
Taylor Dent's first serve from the deuce side, filmed from the front. His trunk coils subtly as his tossing arm rises, with a noticeable shoulder tilt and delayed uncoiling of the torso initiating just before the arm accelerates up to contact.
|
|
2.5s |
BH Return Slice 2nd Serve · Ad · Front #2
Taylor Dent's second serve return backhand slice from the Ad court, filmed from the front. After contact, his one-handed backhand follow-through finishes out in front with the non-hitting hand retracting toward his body as he quickly recovers back into a compact ready position.
|
|
3.9s |
BH Return Slice 2nd Serve · Deuce · Front #2
Taylor Dent's backhand slice return of a second serve from the deuce side, filmed from the front. His compact split step into a slightly open stance sets up a short lateral adjustment and a controlled recovery step back toward the center.
|
|
2.3s |
BH Slice → Return 1st Serve · Ad · Front #3
Taylor Dent's first serve return from the Ad court, filmed from the front. His split-step is timed just before the opponent’s contact, followed by a small diagonal adjustment and a compact neutral stance as he slices the backhand.
|
|
3s |
BH Slice → Return 1st Serve · Ad · Front #4
Taylor Dent's first serve return from the Ad court, filmed from the front. At contact his one-handed backhand slice return shows a slightly open racket face with the ball meeting the strings around waist height as the racket tracks forward on a compact, abbreviated swing path.
|
|
2.7s |
FH Return 1st Serve · Deuce · Front #1
Taylor Dent's first serve return from the deuce court, filmed from the front. He uses a compact split step into a semi-open stance, then takes a short lateral adjustment step with his right foot to set his base before initiating the return.
|
|
2.6s |
FH Return 2nd Serve · Ad · Front #1
Taylor Dent's second serve return from the Ad court, filmed from the front. His compact split step into a semi-open stance is followed by a quick pivot and small adjustment steps that set his feet before he drives into the return.
|
|
2.2s |
FH Return 2nd Serve · Ad · Front #2
Taylor Dent's second serve return from the Ad side, filmed from the front. His compact split step into a slightly open stance is followed by a short lateral adjustment step that sets his weight onto the front foot before contact.
|
|
3.3s |
FH Return 2nd Serve · Deuce · Front #2
Taylor Dent's second serve from the deuce side, filmed from the front. His initial shoulder turn is moderate with the tossing shoulder slightly elevated, and you can clearly see the trunk coil deepen as he bends into the trophy position before uncoiling in sequence from hips to shoulders into contact.
|
|
2.6s |
FH Return Slice 2nd Serve · Ad · Front #2
Taylor Dent's second serve from the Ad court, filmed from the front. After contact he drives his weight into the court and quickly brings both hands back toward a compact ready position to prepare for the next shot.
|
|
2.8s |
BH Return Slice 2nd Serve → BH Volley · Ad · Rear · 125fps
Taylor Dent's second serve from the ad court, filmed from a rear angle. His shoulders and trunk coil strongly away from the target during the toss, then uncoil in a clearly sequenced motion from hips to shoulders into contact.
|
125 |
5.3s |
BH Return 2nd Serve · Ad · Rear #2
Taylor Dent's second serve from the Ad court, filmed from a rear angle. His continental grip is evident, and you can clearly see the wrist pronation through contact as his hitting hand rotates outward to impart spin.
|
|
2.2s |
BH Return Slice 2nd Serve · Ad · Rear #2
Taylor Dent's second serve from the Ad court, filmed from a rear angle. His shoulders and trunk coil deeply away from the court during the toss, then uncoil in a pronounced sequence that starts from the hips and trunk before the hitting arm whips up into contact.
|
|
2.7s |
BH Return Slice 2nd Serve · Ad · Rear #3
Taylor Dent's second serve from the Ad side, filmed from a rear angle. His continental grip is clearly visible, with a relaxed wrist that pronates sharply through contact to add spin and control.
|
|
3.2s |
BH Return Slice 2nd Serve · Deuce · Rear #2
Taylor Dent's second serve return backhand slice from the deuce court, filmed from the rear. From this angle you can see his shoulders turn early as his trunk coils against the hips, then uncoil in sequence so the torso unwinds just before the one-handed slice contact.
|
|
3.3s |
BH Slice → Return 1st Serve · Ad · Rear #1
Taylor Dent's first serve from the Ad court, filmed from the rear. After contact he lands into the court with his weight moving forward and his non-hitting arm dropping back as he quickly regains a balanced, ready position for the next shot.
|
|
3s |
BH Slice → Return 1st Serve · Ad · Rear #2
Taylor Dent's first serve from the Ad court, filmed from a rear angle. From this view, his continental grip is evident with a firm but relaxed wrist that pronates aggressively through contact, creating a distinct wrist snap just after impact.
|
|
3s |
BH Slice → Return 1st Serve · Ad · Rear #3
Taylor Dent's first serve from the Ad court, filmed from a rear angle. His continental grip is clearly visible on the serve, with a loose wrist that pronates aggressively through contact to add spin and disguise.
|
|
2.7s |
BH Slice → Return 1st Serve · Deuce · Rear #1
Taylor Dent's first serve return from the deuce side, filmed from a rear angle. His initial split-step into a slightly open stance is followed by a short lateral adjustment step to his right before planting for the sliced one-handed backhand.
|
|
2.1s |
BH Slice → Return 2nd Serve · Ad · Rear #1
Taylor Dent's second serve from the Ad court, filmed from a rear angle. His shoulder line turns noticeably more than his hips during the trophy phase, creating a clear upper–lower body separation before the trunk uncoils up and into the serve.
|
|
3.3s |
FH Return 1st Serve · Deuce · Rear #1
Taylor Dent's first serve from the deuce court, filmed from a rear angle. His racket contacts the ball at a high point with the strings slightly tilted forward, and the upward swing path creates strong racket head acceleration through contact.
|
|
3.6s |
FH Return 1st Serve · Deuce · Rear #2
Taylor Dent's first serve from the deuce court, filmed from the rear. His footwork features a pronounced platform stance with a strong knee bend and an explosive upward drive off both legs before landing slightly inside the baseline.
|
|
2.6s |
FH Return 1st Serve · Deuce · Rear #3
Taylor Dent's first serve from the deuce court, filmed from a rear angle. At contact his racket face is slightly tilted upward with the ball struck just above full extension, and the racket head accelerates steeply up and across the ball along a pronounced right-to-left swing path.
|
|
2.4s |
FH Return 2nd Serve · Ad · Rear #1
Taylor Dent's second serve return from the Ad court, filmed from a rear angle. He uses a compact split step into a slightly open stance, then takes a small adjustment step with his right foot before driving into the return and recovering toward the center.
|
|
2.8s |
FH Return 2nd Serve · Ad · Rear #2
Taylor Dent's second serve from the Ad court, filmed from a rear angle. His deep knee bend and explosive leg drive upward are clearly visible, with his hips uncoiling toward the target as he extends off the ground.
|
|
2.8s |
FH Return Slice 1st Serve · Ad · Rear #1
Taylor Dent's first serve return slice from the Ad court, filmed from the rear. From this angle you can clearly see his early shoulder turn and strong trunk coil, with the uncoiling of his torso initiating the forward motion of the racquet through contact.
|
|
2.3s |
FH Return Slice 1st Serve · Ad · Rear #001
Taylor Dent's first serve from the Ad court, filmed from a rear angle. His continental grip is clearly visible on the handle, and you can see a pronounced wrist pronation through contact that continues into a full, relaxed follow-through.
|
|
2.8s |
FH Return Slice 1st Serve · Ad · Rear #1
Taylor Dent's first serve from the Ad court, filmed from a rear angle. After contact he lands into the court with his weight moving forward, his non-hitting arm dropping back as he quickly regains a balanced stance to recover for the next shot.
|
|
2.3s |
FH Return Slice 1st Serve · Ad · Rear #2
Taylor Dent's first serve return slice from the Ad court, filmed from a rear angle. His split-step is timed just before contact and he uses a compact lateral shuffle into a slightly open stance before carving the slice.
|
|
2.3s |
FH Return 2nd Serve · Ad · Side #4
Taylor Dent's second serve from the ad side, filmed from the side. His deep knee bend and strong upward leg drive into the court are clearly visible, with the hips uncoiling vertically as he extends to contact.
|
|
2.8s |
BH Return 2nd Serve · Ad · Side #1
Taylor Dent's second serve from the Ad court, filmed from the side. His deep knee bend and strong leg drive upward into the ball are clearly visible, with his hips uncoiling as he extends off the ground.
|
|
3.1s |
BH Return 2nd Serve · Ad · Side #2
Taylor Dent's second serve from the Ad side, filmed from the side. His shoulders load with a pronounced turn relative to his hips before uncoiling in sync with trunk rotation to drive up into the ball.
|
|
2.3s |
BH Return 2nd Serve · Deuce · Side #1
Taylor Dent's second serve from the deuce side, filmed from the side. His follow-through carries his weight into the court with his back leg swinging through, and he quickly brings both hands toward a neutral ready position for the next shot.
|
|
2.6s |
BH Return 2nd Serve · Deuce · Side #2
Taylor Dent's second serve from the deuce side, filmed from a side angle. The racket contacts the ball slightly above shoulder height with a closed face and an upward, brushing swing path that creates visible kick and upward racket head acceleration through contact.
|
|
2.1s |
BH Return Slice 1st Serve · Ad · Side #1
Taylor Dent's first serve from the Ad court, filmed from the side. His shoulders rotate well past 90 degrees relative to his hips on the toss, then his trunk uncoils in a clearly sequenced motion from pelvis to torso to shoulder as he drives up to contact.
|
|
3s |
BH Return Slice 1st Serve · Ad · Side #2
Taylor Dent's first serve from the Ad court, filmed from the side. His follow-through carries his hitting arm across his body while his weight lands on his front foot, quickly bringing his non-hitting hand back toward a ready position.
|
|
2.7s |
BH Return Slice 1st Serve · Ad · Side #3
Taylor Dent's first serve from the ad court, filmed from the side. His hips load deeply with a noticeable knee bend before driving upward, with the back leg extending strongly into the court during the serve motion.
|
|
3.4s |
BH Return Slice 1st Serve · Deuce · Side #1
Taylor Dent's first serve from the deuce court, filmed from the side. His shoulder line rotates deeply away from the court during the toss, creating a pronounced trunk coil that uncoils sequentially from hips to shoulders into contact.
|
|
2.1s |
BH Return Slice 1st Serve · Deuce · Side #2
Taylor Dent's first serve from the deuce court, filmed from the side. After contact his hitting arm extends fully into the court while his back leg swings through, helping him land inside the baseline and transition quickly toward a ready position.
|
|
2.6s |
BH Return Slice 1st Serve · Deuce · Side #3
Taylor Dent's first serve return slice from the deuce side, filmed from the side. His knees are visibly flexed during the return preparation, with a noticeable push off the outside leg as his hips stay relatively closed through contact.
|
|
2.3s |
BH Slice → Return 1st Serve · Ad · Side #4
Taylor Dent's first serve return backhand slice from the Ad side, filmed from the side. His follow-through finishes out in front with the non-hitting hand counterbalancing behind him as he quickly recovers toward a neutral ready position.
|
|
3.1s |
FH Return 2nd Serve · Ad · Side #1
Taylor Dent's second serve from the Ad court, filmed from the side. His hips load with a deep knee bend and then drive up aggressively, with the back leg extending fully to propel his body into the court.
|
|
2.5s |
FH Return 2nd Serve · Ad · Side #2
Taylor Dent's second serve from the Ad court, filmed from a side angle. His continental grip is firm with a relaxed wrist that pronates aggressively through contact, creating a pronounced wrist snap just after impact.
|
|
1.9s |
FH Return 2nd Serve · Ad · Side #3
Taylor Dent's second serve from the Ad side, filmed from the side. At contact his racket face is slightly closed with the ball struck just above head height, and the upward swing path creates heavy pronation through the hit.
|
|
2.8s |
FH Return 2nd Serve · Ad · Side #4
Taylor Dent's second serve from the Ad side, filmed from a side angle. His continental grip is firm with a relaxed wrist that pronates aggressively through contact, creating a pronounced wrist snap just after impact.
|
|
2.8s |
FH Return Slice 1st Serve · Ad · Side #1
Taylor Dent's first serve return slice from the Ad court, filmed from the side. His shoulders rotate as a single unit with the trunk on the compact takeback, then uncoil together through contact with minimal independent shoulder over-rotation.
|
|
6.5s |
FH Return Slice 1st Serve · Deuce · Side #1
Taylor Dent's first serve from the deuce side, filmed from a side angle. His deep knee bend and strong upward leg drive into the court are clearly visible as his hips uncoil toward the target.
|
|
2.7s |
FH Return Slice 1st Serve · Deuce · Side #2
Taylor Dent's first serve from the deuce side, filmed from the side. After contact he drives his weight forward into the court and quickly lets his non-hitting arm drop back as he lands in a balanced position ready to move for the next ball.
|
|
2.3s |
FH Return Slice 1st Serve · Deuce · Side #3
Taylor Dent's first serve from the deuce side, filmed from a side angle. His shoulders turn well past 90 degrees relative to the baseline, creating a pronounced trunk coil that uncoils in sync with his leg drive and upward swing.
|
|
3.5s |
FH Return Slice 2nd Serve · Deuce · Side #2
Taylor Dent's second serve from the deuce side, filmed from the side. At contact his racket face is slightly closed with the ball struck just above head height, and the upward swing path creates noticeable racket head acceleration through the hit.
|
|
2.9s |
FH Return Slice 2nd Serve · Deuce · Side #001
Taylor Dent's second serve from the deuce side, filmed from the side. He uses a pronounced knee bend with a rhythmic rocking motion into the court, pushing off his back leg to drive up into a balanced landing on his front foot.
|
|
3s |
FH Return Slice 2nd Serve · Deuce · Side #002
Taylor Dent's second serve from the deuce side, filmed from the side. At contact his racket face is slightly closed with the ball struck just above head height, and the upward swing path creates visible racket head acceleration through the hitting zone.
|
|
2.9s |
Second Serve → BH Volley → BH Volley · Ad · Court-level-front #2
Taylor Dent's backhand volley from the Ad side, filmed from a court-level front angle. His shoulders stay relatively square with a slight trunk rotation, and you can see a compact upper-body turn forward as the hitting shoulder drives through the volley.
|
|
8.4s |
Second Serve · Ad · Body-rotation · Court-level-front #2
Taylor Dent's second serve from the Ad court, filmed from a court-level front angle. His compact stance transitions into a strong upward drive off the back leg, with a clear front-foot landing that sets up immediate recovery toward the baseline center.
|
|
3.6s |
Second Serve · Ad · Court-level-front #1
Taylor Dent's second serve from the Ad court, filmed from a court-level front angle. His shoulders and trunk coil noticeably during the trophy phase, then uncoil in a synchronized sequence with the hip turn to drive up and into the serve.
|
|
3.7s |
Second Serve · Ad · Court-level-front #2
Taylor Dent's second serve from the Ad court, filmed from a court-level front angle. His shoulders turn well past perpendicular to the baseline before uncoiling, with the trunk rotation clearly initiating the upward swing and pulling the hitting arm up and through in sequence.
|
|
4.3s |
Second Serve Down The Middle · Ad · Court-level-front #2
Taylor Dent's second serve from the Ad court down the middle, filmed from a court-level front angle. His follow-through brings his racket hand across his body as his weight lands on his front foot, and he quickly settles into a compact ready position with both hands prepared for the next shot.
|
|
4s |
Second Serve Down The Middle · Ad · Court-level-front #001
Taylor Dent's second serve from the Ad side down the middle, filmed from a court-level front angle. His follow-through carries his racquet hand across his body while his weight lands on his front foot, quickly bringing both hands back to a ready position for the next shot.
|
|
4s |
Second Serve → FH Volley · Ad · Court-level-front #2
Taylor Dent's forehand volley from the Ad side, filmed from a court-level front angle. After contact his racquet finishes slightly across his body while his weight drives forward into the court, and his non-hitting hand stays back to help him stabilize and prepare for the next ball.
|
|
5.7s |
Second Serve · Ad · Toss · Court-level-front #2
Taylor Dent's second serve from the Ad court, filmed from court-level front. His shoulders and trunk coil deeply away from the court before uncoiling in sequence, with a pronounced upper-body lead into contact that is easy to see from the front.
|
|
3.6s |
Second Serve Wide · Ad · Court-level-front #2
Taylor Dent's second serve from the Ad side out wide, filmed from a court-level front angle. His continental grip is easy to see here, with a loose wrist that pronates aggressively through contact to add spin and control on the wide serve.
|
|
3.7s |
Second Serve Wide · Ad · Court-level-front #001
Taylor Dent's second serve from the Ad court, hit wide and filmed from a court-level front angle. The contact point is slightly in front of his body with the racket face tilted for heavy spin, and the racket accelerates steeply upward along the right side of his head to create a pronounced brushing action on the ball.
|
|
3.7s |
Second Serve · Deuce · Arm-action · Court-level-front #2
Taylor Dent's second serve from the deuce side, filmed from a court-level front angle. His shoulder line rotation into the trophy position and the rapid uncoiling of the trunk into contact are clearly visible, showing how the upper body leads the arm swing in the service motion.
|
|
2.6s |
Second Serve → BH Half Volley · Deuce · Court-level-front #2
Taylor Dent's second serve from the deuce side, filmed from a court-level front angle. From this angle you can clearly see his continental grip stay firm while his wrist pronates through contact to add spin and control on the serve.
|
|
5.7s |
Second Serve · Deuce · Body-rotation · Court-level-front #2
Taylor Dent's second serve from the deuce side, filmed from a court-level front angle. His shoulders and trunk show a pronounced coil during the toss phase, then uncoil in sequence from the hips through the torso to the hitting shoulder as he drives up into the serve.
|
|
3.5s |
Second Serve · Deuce · Court-level-front #1
Taylor Dent's second serve from the deuce court, filmed from a court-level front angle. His compact service motion includes a small front-leg adjustment into the court before landing on his left foot, setting up a quick recovery step toward the baseline center.
|
|
3.1s |
Second Serve · Deuce · Court-level-front #2
Taylor Dent's second serve from the deuce side, filmed from a court-level front angle. His deep knee bend and strong upward leg drive into the court are clearly visible, with the hips uncoiling vertically as he pushes off the ground.
|
|
3.8s |
Second Serve Down The Middle · Deuce · Court-level-front #2
Taylor Dent's second serve from the deuce side down the middle, filmed from a court-level front angle. His compact service motion includes a small, quick adjustment of the back foot into a stable platform stance before driving up into the ball.
|
|
3.3s |
Second Serve Down The Middle · Deuce · Court-level-front #001
Taylor Dent's second serve from the deuce side, filmed from a court-level front angle. His continental grip and relaxed hand position make the wrist pronation through contact especially clear from this angle.
|
|
3.3s |
Second Serve → FH Volley → BH Volley · Deuce · Court-level-front #2
Taylor Dent's forehand volley from the deuce side, filmed from a court-level front angle. He uses a compact split step just before contact and keeps a slightly open stance as he pushes off his outside leg to move through the volley toward the net.
|
|
7.5s |
Second Serve · Deuce · Leg-action · Court-level-front #2
Taylor Dent's second serve from the deuce side, filmed from a court-level front angle. The racket face is slightly closed at contact with the ball struck around head height, and you can clearly see the upward swing path and acceleration of the racket head through the hitting zone.
|
|
3.6s |
Second Serve · Deuce · Toss · Court-level-front #1
Taylor Dent's second serve from the deuce side, filmed from a court-level front angle. He sets up with a stable base, using a controlled knee bend and a smooth weight transfer from back to front foot during the trophy position and upward drive.
|
|
3.5s |
Second Serve · Deuce · Toss · Court-level-front #2
Taylor Dent's second serve from the deuce side, filmed from a court-level front angle. At contact his racket face is slightly closed with the ball struck just above head height, and the upward swing path produces noticeable racket head acceleration through the hit.
|
|
3.3s |
Second Serve · Ad · Arm-action · Court-level-rear #2
Taylor Dent's second serve from the Ad side, filmed from a court-level rear angle. His continental grip is firm with a relaxed wrist that pronates aggressively through contact, creating a distinct upward snap as the racket accelerates into the ball.
|
|
3.9s |
Second Serve → BH Volley · Ad · Court-level-rear #2
Taylor Dent's backhand volley from the Ad side, filmed from a court-level rear angle. From this view you can see his continental grip stay firm with minimal grip change and a stable wrist that stays laid back through contact without collapsing.
|
|
5.5s |
Second Serve · Ad · Court-level-rear #2
Taylor Dent's second serve from the Ad court, filmed from a court-level rear angle. His hips stay closed longer during the toss and loading phase, with a pronounced knee bend and upward leg drive that uncoils his lower body into the court.
|
|
3.4s |
Second Serve Down The Middle · Ad · Court-level-rear #2
Taylor Dent's second serve from the Ad side down the middle, filmed from a court-level rear angle. After contact, his weight drives into the court and his back leg swings forward, bringing him quickly into a balanced, upright ready position for the next ball.
|
|
3.4s |
Second Serve Down The Middle · Ad · Court-level-rear #001
Taylor Dent's second serve from the Ad court down the middle, filmed from a court-level rear angle. His shoulders and trunk show a pronounced coil during the trophy phase, then uncoil sequentially from hips to shoulders into contact, with clear shoulder-over-shoulder action visible from behind.
|
|
3.4s |
Second Serve → FH Volley · Ad · Court-level-rear #2
Taylor Dent's forehand volley from the Ad side, filmed from a court-level rear angle. His split-step just before the opponent contacts the return leads into a short diagonal adjustment step and a slightly open stance as he moves forward through the volley.
|
|
5.5s |
Second Serve · Ad · Leg-action · Court-level-rear #1
Taylor Dent's second serve from the Ad court, filmed from a court-level rear angle. His rhythmic leg drive is easy to see here, with a deep knee bend loading on the back leg before an explosive push up into the court and a balanced landing on his front foot.
|
|
3.9s |
Second Serve · Ad · Leg-action · Court-level-rear #2
Taylor Dent's second serve from the Ad side, filmed from a court-level rear angle. From this view, his continental grip is evident with a relaxed hand and a pronounced wrist pronation through contact that continues well into the follow-through.
|
|
3.5s |
Second Serve · Ad · Toss · Court-level-rear #2
Taylor Dent's second serve from the Ad court, filmed from a court-level rear angle. After contact his weight moves into the court and he quickly drops his tossing arm to transition into a balanced, upright ready position for the next shot.
|
|
3.7s |
Second Serve · Deuce · Court-level-rear #2
Taylor Dent's second serve from the deuce side, filmed from a court-level rear angle. His deep knee bend and strong upward leg drive into the court are clearly visible, with the hips uncoiling aggressively toward the target as he extends.
|
|
3.2s |
Second Serve → FH Volley · Deuce · Court-level-rear #2
Taylor Dent's forehand volley from the deuce court, filmed from a court-level rear angle. At contact his racket face is slightly open with the ball met just in front of his body, and the compact punchy swing path keeps the racket head moving directly through the ball.
|
|
7.2s |
Second Serve · Deuce · Leg-action · Court-level-rear #2
Taylor Dent's second serve from the deuce side, filmed from a court-level rear angle. His racket drops deep on edge before contact and then whips up on a steep, fast swing path, with the strings slightly closed at impact to impart strong spin.
|
|
3.3s |
Second Serve · Deuce · Toss · Court-level-rear #2
Taylor Dent's second serve from the deuce side, filmed from a court-level rear angle. His continental grip is firm with a slightly laid-back wrist, and you can clearly see the wrist pronation driving the racquet head through contact.
|
|
3.5s |
Second Serve → BH Volley · Ad · Court-level-side #2
Taylor Dent's backhand volley from the Ad side at the net, filmed from a court level side angle. His knees are noticeably flexed with a strong base, and his hips stay relatively square to the net as he steps forward, driving off the outside leg into the volley.
|
|
6.2s |
Second Serve · Ad · Body-rotation · Court-level-side #2
Taylor Dent's second serve from the Ad court, filmed from a court-level side angle. His shoulders load with a pronounced sideways turn relative to the baseline, then uncoil in sync with his trunk rotation so that his chest squares toward the net just after contact.
|
|
3.8s |
Second Serve · Ad · Court-level-side #2
Taylor Dent's second serve from the Ad court, filmed from a court-level side angle. The side view makes it easy to see his slightly closed racket face at contact and the upward swing path that creates heavy spin with the ball struck just above shoulder height.
|
|
3.9s |
Second Serve → FH Half Volley · Ad · Court-level-side #2
Taylor Dent's second serve from the Ad court, filmed from a court-level side angle. The side view makes it easy to see his contact point slightly above head height with a moderately closed racket face and an upward, accelerating swing path through the ball.
|
|
6.1s |
Second Serve → FH Volley → BH Drop Volley · Ad · Court-level-side #2
Taylor Dent's forehand volley from the Ad side, filmed from a court-level side angle. The contact point is well in front of his body with the racket face slightly open, creating a soft drop volley with a compact, abbreviated swing path.
|
|
8.6s |
Second Serve → FH Volley · Ad · Court-level-side #2
Taylor Dent's forehand volley from the Ad side, filmed from a court-level side angle. His continental grip is clearly visible with a firm but relaxed wrist, staying stable through contact with only a slight forward punch rather than any noticeable wrist snap.
|
|
7.2s |
Second Serve → FH Volley · Ad · Toss · Court-level-side #2
Taylor Dent's forehand volley from the ad side, filmed from a court-level side angle. His hips stay relatively square to the net while his knees remain flexed, showing a short forward leg drive as he steps through the volley.
|
|
6s |
Second Serve → BH Volley · Deuce · Court-level-side #2
Taylor Dent's backhand volley from the deuce side, filmed from a court-level side angle. His strong knee flex and forward-driving right hip into the court are clearly visible as he moves through the volley.
|
|
5.7s |
Second Serve · Deuce · Court-level-side #2
Taylor Dent's second serve from the deuce court, filmed from the court-level side. After contact he drives his weight into the court and finishes with a compact, abbreviated follow-through that quickly returns his racquet hand toward a neutral ready position.
|
|
3.9s |
Second Serve → FH Volley → BH Volley · Deuce · Court-level-side #2
Taylor Dent's forehand volley from the deuce court, filmed from a court-level side angle. After contact he drives his weight forward into the court and quickly brings his racquet and non-hitting hand back toward a compact ready position for the next shot.
|
|
7.8s |
Second Serve · Deuce · Toss · Court-level-side #2
Taylor Dent's second serve from the deuce side, filmed from a court-level side angle. His shoulder line turns noticeably more than his hips to create trunk coil, then his upper body uncoils upward and into the court in sequence before his arm whips through contact.
|
|
3.4s |
Second Serve Down The Middle · Ad · Front #2
Taylor Dent's second serve from the Ad court, filmed from the front. His feet come together in a pinpoint stance before he drives up into the serve, with a small front-foot adjustment to maintain alignment toward the middle of the box.
|
|
3.8s |
Second Serve Down The Middle · Ad · Front #001
Taylor Dent's second serve from the Ad court down the middle, filmed from the front. His shoulders stay closed longer than his hips during the trophy phase, creating a noticeable trunk coil that unwinds in sequence from legs to torso to serving arm.
|
|
3.8s |
Second Serve → FH Volley · Ad · Front #2
Taylor Dent's forehand volley from the Ad side, filmed from a front angle. His follow-through finishes high with the racquet in front of his body as he steps through the volley and quickly begins to square his shoulders back toward a ready position.
|
|
5.6s |
Second Serve → FH Volley → OH · Ad · Front #2
Taylor Dent's forehand volley from the Ad side, filmed from the front. His compact split step just before contact sets up a firm, slightly open stance with a short forward lunge toward the net.
|
|
8.7s |
Second Serve · Ad · Front #1
Taylor Dent's second serve from the Ad side, filmed from the front. His continental grip is firm with a slightly laid-back wrist, and you can clearly see the pronounced wrist pronation as he drives up and through the ball.
|
|
3.6s |
Second Serve · Ad · Front #2
Taylor Dent's second serve from the Ad side, filmed from the front. His continental grip is clearly visible, with a relaxed wrist that pronates aggressively through contact to add spin and control on the second serve.
|
|
3.8s |
Second Serve · Ad · Front #3
Taylor Dent's second serve from the Ad court, filmed from the front. His continental grip is clearly visible with a firm but relaxed hand, and you can see pronounced wrist pronation through contact as the racquet edge leads and then turns outward into the court.
|
|
3.7s |
Second Serve · Ad · Front #4
Taylor Dent's second serve from the Ad court, filmed from the front. His deep knee bend and strong upward leg drive are clearly visible as his hips stay closed to the net until just after contact.
|
|
3.6s |
Second Serve · Ad · Toss · Front #2
Taylor Dent's second serve from the Ad court, filmed from the front. His deep knee bend and strong upward leg drive are clearly visible as his hips uncoil toward the target during the serve motion.
|
|
3.8s |
Second Serve Wide → BH Volley · Ad · Front #2
Taylor Dent's backhand volley from the ad court on a wide ball, filmed from the front. After contact his racquet finishes slightly across his body as he steps through with his front foot, quickly bringing his non-hitting hand back to center to recover toward a ready position.
|
|
5.8s |
Second Serve Wide · Ad · Front #2
Taylor Dent's second serve from the Ad court, hit wide and filmed from the front. His continental grip is clearly visible, with a firm but relaxed wrist that pronates aggressively through contact to direct the serve out wide.
|
|
3.9s |
Second Serve Wide · Ad · Front #001
Taylor Dent's second serve from the Ad court, hit wide and filmed from the front. His continental grip is clearly visible, with a relaxed hand and pronounced wrist pronation through contact to add spin and control on the wide serve.
|
|
3.9s |
Second Serve · Deuce · Arm-action · Front #2
Taylor Dent's second serve from the deuce side, filmed from the front. His hips stay relatively closed to the net while his knees drive into a deep bend, creating a strong upward leg drive through contact.
|
|
3.7s |
Second Serve → BH Volley · Deuce · Front #2
Taylor Dent's backhand volley from the deuce court, filmed from the front. His shoulders stay relatively closed through contact while the trunk uncoils late, with a compact torso rotation that links a short shoulder turn to the forward drive of the arm.
|
|
5.9s |
Second Serve · Deuce · Body-rotation · Front #2
Taylor Dent's second serve from the deuce side, filmed from the front. His hips stay relatively closed through the toss and knee bend before driving upward, with a noticeable push off the back leg that brings the front hip through into the court.
|
|
3.3s |
Second Serve Down The Middle · Deuce · Front #1
Taylor Dent's second serve from the deuce side, filmed from the front. His shoulders turn noticeably away from the target line during the toss, then uncoil in sync with his trunk rotation to drive up through the serve.
|
|
3.9s |
Second Serve Down The Middle · Deuce · Front #001
Taylor Dent's second serve from the deuce court, filmed from the front. His shoulders rotate as a unit with the trunk during the toss and then uncoil aggressively toward the target, with a pronounced upward trunk extension visible at contact.
|
|
3.9s |
Second Serve Down The Middle · Deuce · Front #2
Taylor Dent's second serve from the deuce side, filmed from the front. At contact his racket face is slightly closed with the ball struck just above head height, and the upward swing path creates noticeable racket head acceleration through the hitting zone.
|
|
3.6s |
Second Serve Down The Middle · Deuce · Front #001
Taylor Dent's second serve from the deuce court, filmed from the front. His continental grip is firm with a relaxed wrist that pronates aggressively through contact, creating a distinct wrist snap visible as the racket accelerates up and through the ball.
|
|
3.6s |
Second Serve · Deuce · Front #1
Taylor Dent's second serve from the deuce court, filmed from the front. After contact he lands on his front foot with his non-hitting arm dropping back for balance before he quickly settles into a compact ready position.
|
|
3.6s |
Second Serve · Deuce · Front #2
Taylor Dent's second serve from the deuce side, filmed from the front. At contact his racket face is slightly closed with the ball struck just above head height, and you can see the upward, brushing swing path creating spin as the racket accelerates through the hitting zone.
|
|
3.9s |
Second Serve · Deuce · Front #3
Taylor Dent's second serve from the deuce side, filmed from the front. At contact his racket face is slightly closed with the ball struck just above head height, and the upward swing path creates noticeable racket head speed and spin.
|
|
3.6s |
Second Serve · Deuce · Front #4
Taylor Dent's second serve from the deuce court, filmed from the front. His shoulders and trunk show a pronounced coil during the toss phase, with a clear uncoiling sequence that starts from the hips and trunk rotation before the serving arm accelerates up to contact.
|
|
3.7s |
Second Serve · Deuce · Front #5
Taylor Dent's second serve from the deuce side, filmed from the front. His compact, rhythmic service motion includes a measured knee bend and a controlled front-foot plant that sets a stable base before he drives up to the ball.
|
|
3.1s |
Second Serve · Deuce · Toss · Front #2
Taylor Dent's second serve from the deuce side, filmed from the front. His shoulder line turns slightly away from the target while the trunk coils as he brings the tossing arm up, then the torso uncoils in sequence ahead of the arm swing to initiate racquet acceleration.
|
|
3.5s |
Second Serve Wide · Deuce · Front #2
Taylor Dent's second serve from the deuce court, hit wide and filmed from the front. His deep knee bend and strong upward leg drive are clearly visible as his hips stay relatively closed to the baseline through the loading phase.
|
|
3.6s |
Second Serve Wide · Deuce · Front #001
Taylor Dent's second serve out wide from the deuce side, filmed from the front. His shoulders and trunk show a pronounced coil during the trophy phase, then uncoil in sequence from the hips through the torso to the shoulder as he drives up into the serve.
|
|
3.6s |
Second Serve · Ad · Arm-action · Rear #1
Taylor Dent's second serve from the Ad side, filmed from a rear angle. The view clearly displays his arm action with a loose racquet at contact, hitting the ball slightly above head height with a pronounced upward swing path and closed racquet face.
|
|
3.6s |
Second Serve · Ad · Arm-action · Rear #2
Taylor Dent's second serve from the Ad side, filmed from a rear angle. After contact his hitting arm extends fully toward the target while his back leg swings through, helping him land inside the court and quickly regain a balanced ready position.
|
|
3.5s |
Second Serve → BH Volley · Ad · Rear #2
Taylor Dent's backhand volley from the Ad side, filmed from a rear angle. At contact his one-handed backhand volley shows a slightly open racket face with the ball struck around waist height, the racket head moving firmly through the line of the shot.
|
|
6.5s |
Second Serve · Ad · Leg-action · Rear #2
Taylor Dent's second serve from the Ad court, filmed from a rear angle. His shoulders rotate as a unit with a pronounced trunk coil during the toss, then uncoil aggressively upward so the trunk and shoulder line stay synced through contact.
|
|
3.9s |
Second Serve · Ad · Rear #2
Taylor Dent's second serve from the ad court, filmed from a rear angle. His footwork features a rhythmic rocking motion into the toss with a pronounced knee bend, and his back leg drives up and through the court before landing inside the baseline in a balanced, slightly open stance.
|
|
3.5s |
Second Serve · Ad · Toss · Rear #2
Taylor Dent's second serve from the Ad side, filmed from a rear angle. His follow-through carries his body weight into the court and he quickly brings both hands back to the ready position in front of his torso to prepare for the next shot.
|
|
3.9s |
Second Serve · Deuce · Arm-action · Rear #2
Taylor Dent's second serve from the deuce side, filmed from a rear angle. His shoulder line turns well beyond perpendicular to the baseline, creating a pronounced trunk coil that uncoils in sync with his upward arm swing into contact.
|
|
3.6s |
Second Serve · Deuce · Rear #2
Taylor Dent's second serve from the deuce court, filmed from a rear angle. From this view, his continental grip is firm with a slightly extended index finger, and you can see pronounced wrist pronation through contact as the strings brush up and across the ball.
|
|
3.9s |
Second Serve · Deuce · Rear #1
Taylor Dent's second serve from the deuce side, filmed from a rear angle. After contact he drives his weight into the court and quickly brings both hands back to a neutral ready position to prepare for the next shot.
|
|
3.7s |
Second Serve · Deuce · Rear #2
Taylor Dent's second serve from the deuce court, filmed from a rear angle. After contact his momentum carries slightly into the court as his hitting arm finishes across his body and he quickly brings both hands back toward a ready position for the next shot.
|
|
3.6s |
Second Serve Wide → BH Volley · Deuce · Rear #2
Taylor Dent's backhand volley from the deuce court on a wide second-serve return position, filmed from a rear angle. His hips stay relatively closed to the net as he steps diagonally with the outside leg, with a noticeable knee bend that supports a stable, low base through contact.
|
|
5.7s |
Second Serve Wide · Deuce · Rear #2
Taylor Dent's second serve from the Deuce court out wide, filmed from a rear angle. His legs load with a deep knee bend before driving upward, and his hips stay closed toward the baseline until just after contact.
|
|
3.7s |
Second Serve Wide · Deuce · Rear #001
Taylor Dent's second serve from the deuce court out wide, filmed from a rear angle. After contact, his follow-through finishes across his body with his weight moving into the court, and he quickly brings both hands back to a ready position as he recovers toward the baseline.
|
|
3.8s |
Second Serve Wide · Deuce · Rear #002
Taylor Dent's second serve from the deuce side out wide, filmed from a rear angle. His continental grip is firm with a relaxed wrist that pronates aggressively through contact, creating a pronounced wrist snap toward the wide target.
|
|
3.7s |
Second Serve → BH Half Volley → BH Drop Volley → FH Half Volley · Ad · Side #2
Taylor Dent's second serve from the ad court, filmed from the side. From this angle you can see his shoulders fully turn away from the court during the toss, with a pronounced trunk coil that uncoils sequentially from hips to shoulders as he drives up into contact.
|
|
11.9s |
Second Serve → BH Half Volley · Ad · Side #2
Taylor Dent's second serve from the Ad side, filmed from the side. His knees load deeply before driving upward, with the hips extending aggressively into the court to support his forward momentum into the court.
|
|
5.3s |
Second Serve · Ad · Side #2
Taylor Dent's second serve from the Ad side, filmed from the side. His shoulder line turns well past perpendicular to the baseline on the trophy phase, then the trunk uncoils aggressively upward and into the court in sync with the shoulder over-rotation.
|
|
3.4s |
Second Serve · Ad · Toss · Side #2
Taylor Dent's second serve from the ad court, filmed from the side. At contact his racket face is slightly closed with the ball struck just above head height, and you can clearly see the upward, brushing swing path accelerating through the ball.
|
|
3.6s |
Second Serve → BH Volley · Deuce · Side #1
Taylor Dent's backhand volley from the deuce side, filmed from a side angle. His shoulders stay mostly square with a compact trunk rotation, with a brief coil and quick uncoil through contact that clearly links his shoulder turn to the forward drive of the arm.
|
|
5.6s |
Second Serve · Deuce · Body-rotation · Side #1
Taylor Dent's second serve from the deuce side, filmed from the side. His deep knee bend and aggressive leg drive into the court are clearly visible, with the hips uncoiling upward and forward as he extends to contact.
|
|
3.4s |
Second Serve · Deuce · Body-rotation · Side #2
Taylor Dent's second serve from the deuce side, filmed from a side angle. His rhythmical footwork into the serve includes a pronounced weight transfer from back to front leg and a strong knee bend before driving up into an aggressive, side-on stance.
|
|
3.6s |
Second Serve · Deuce · Side #1
Taylor Dent's second serve from the deuce side, filmed from the side. His compact, rhythmic service motion uses a pronounced knee bend and upward drive, with his back leg kicking through to aid recovery into the court.
|
|
3.4s |
Second Serve · Deuce · Side #2
Taylor Dent's second serve from the deuce side, filmed from a side angle. His contact point is struck slightly in front of his body with the racket face tilted marginally up, and the racket head accelerates on an upward, pronation-heavy path through the ball.
|
|
3.3s |
BH Slice Center · Court-level-front
Taylor Dent's backhand slice from the center of the court, filmed from a front court-level angle. His footwork features a small adjustment step into a slightly closed stance, with a firm front-side plant that anchors the upper-body rotation through the slice.
|
|
3.1s |
BH Slice Center · Court-level-front #1
Taylor Dent's backhand slice from the center of the court, filmed from a court-level front angle. His follow-through finishes with the racquet hand slightly in front of his body while his weight transfers onto his front foot, quickly bringing his non-hitting hand back toward a ready position.
|
|
3.4s |
BH Slice Center · Court-level-front #001
Taylor Dent's backhand slice from the center of the court, filmed from a front court-level angle. His hips stay relatively closed with a pronounced knee bend on the outside leg, giving a stable base as he carves under the ball with a low, skidding trajectory.
|
|
3s |
BH Slice Short · Court-level-front
Taylor Dent's backhand slice from the center of the court, filmed from a front court-level angle. His racket face is noticeably open at contact with the ball struck around waist height, and the downward, slightly forward swing path creates a pronounced underspin effect.
|
|
2.8s |
FH Slice Wide · Court-level-front
Taylor Dent's forehand slice from the center of the court, hit wide, filmed from a court-level front angle. After contact, his racquet finishes out in front with his non-hitting hand extending back for counterbalance as he recovers toward a neutral ready position.
|
|
3.4s |
BH Slice Center · Court-level-side #1
Taylor Dent's backhand slice from the center of the court, filmed from a court-level side angle. His continental grip is clearly visible, with a firm but relaxed wrist that stays stable through contact to keep the racquet face consistently open.
|
|
2.8s |
BH Slice Center · Court-level-side #2
Taylor Dent's backhand slice from the center of the court, filmed from a court-level side angle. He sets up in a neutral stance with a small adjustment step before contact, then uses a couple of quick recovery steps to return to his ready position after the swing.
|
|
2.6s |
BH Slice Center · Court-level-side #3
Taylor Dent's backhand slice from the center of the court, filmed from a court-level side angle. His racket face is slightly open at contact with the ball around waist height, creating a low, skidding trajectory with a compact, downward cutting motion.
|
|
3.1s |
BH Slice Center · Court-level-side #4
Taylor Dent's backhand slice from the center of the court, filmed from a court-level side angle. His follow-through finishes with the racquet hand extended forward while his weight moves into the court, quickly bringing his non-hitting hand back toward the racquet to recover into a ready position.
|
|
2.9s |
BH Slice Center · Court-level-side #5
Taylor Dent's backhand slice from the center of the court, filmed from a court-level side angle. His shoulders turn early to set the racquet high, and the trunk stays relatively stable with a controlled uncoil that lets the hitting arm work down and through the ball on a slightly descending path.
|
|
3.2s |
BH Slice Running · Court-level-side
Taylor Dent's running backhand slice from the side of the court, filmed from a court-level side angle. His follow-through finishes with the racquet hand extended out in front as his weight continues moving through the shot, and he quickly brings the non-hitting hand back toward the center line to recover.
|
|
3.4s |
BH Slice Wide · Court-level-side
Taylor Dent's backhand slice from a wide position, filmed from a court-level side angle. The racket face is noticeably open at contact with the ball around waist height, and the downward, slightly forward swing path creates a pronounced underspin effect.
|
|
2.9s |
BH Slice Wide · Court-level-side #1
Taylor Dent's backhand slice from a wide position, filmed from a court-level side angle. His shoulders turn early to set the racquet high, then the trunk stays relatively quiet through contact as the hitting-side shoulder continues to glide forward, giving a clear view of the upper-body sequencing in the slice motion.
|
|
3.1s |
BH Slice Wide · Court-level-side #2
Taylor Dent's backhand slice from a wide position, filmed from a court-level side angle. His footwork includes a quick lateral adjustment into a slightly closed stance, with a pronounced step across his body before carving the slice.
|
|
3.1s |
BH Slice Running · Front
Taylor Dent's running backhand slice from the center of the court, filmed from the front. His continental grip is clearly visible, with a firm but relaxed wrist that stays laid back through the swing before slightly stabilizing at contact to keep the racket face open.
|
|
3.3s |
BH Slice Wide · Front #1
Taylor Dent's one-handed backhand slice from a wide position, filmed from the front. His continental grip is clearly visible, with a firm but relaxed wrist that stays stable through contact before slightly opening the racquet face on the follow-through.
|
|
2.8s |
BH Slice Wide · Front #2
Taylor Dent's backhand slice from the center, hitting a wide ball, filmed from the front. The racket face is noticeably open at contact with the ball struck slightly below net height, creating a clear downward, cutting swing path through impact.
|
|
3.3s |
BH Slice Center · Rear
Taylor Dent's backhand slice from the center of the court, filmed from a rear angle. His shoulders turn well past 90 degrees relative to the baseline, and you can see a pronounced trunk coil that uncoils smoothly as the racquet tracks down and through the ball.
|
|
2.9s |
BH Slice Short · Side #1
Taylor Dent's backhand slice from the middle of the court, filmed from the side. His shoulders rotate early as he sets the racquet, with a pronounced upper-body tilt and delayed trunk uncoil that keeps the chest side-on through contact.
|
|
2.2s |
BH Slice Short · Side #2
Taylor Dent's backhand slice from the deuce side, filmed from the side. His early shoulder turn and pronounced upper‑body coil are clearly visible, with the trunk staying closed to the net before uncoiling through contact on a slightly descending path.
|
|
2.6s |