
How To Build A Beautiful Serve:
Part 3
By Chris Lewit
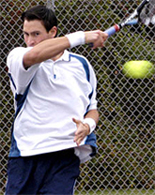
Developing a world-class serve is tough, but you can do it! It's possible to develop great serve mechanics for both the young and old. Remember! Winning Pretty technique is efficient, rhythmic, fluid, balanced, and elastic—never jagged or forced. These are the qualities that are desired for the serve.
This third part of the series builds on the biomechanical structure and checkpoints outlined in Part 1, while sharing my experiences from the trenches teaching thousands of hours of serve mechanics. Part 2 reviewed the eight stage model of the serve and drilled down into the technique and biomechanics of each stage.
I will discuss how to apply those technical details when building a pretty, world-class serve.
Build the Serve From the Ground Up--Like a House
There are many serve courses and systems out there on the internet and social media, all with different approaches. It can be confusing to know how to build a complex technical movement like the serve. Where should a player, coach or parent-coach begin?
I like to build the serve by focusing on the lower body mechanics and footwork first. Look down at the lower body below the waist and fix the areas there. For me, it's like building the foundation of a house. You want the basement to be strong and secure to support the rest of the house structure. Then, I move on to the upper body power checkpoints.
Once the player understands both the lower and upper body checkpoints, I focus on developing the correct sequencing of the power position, deep racquet drop, and leg drive in terms of timing.
Lower Body Keys
To start, analyze fundamental lower body checkpoints such as stance and leg drive. I like to have my players jump and focus on landing with balance in a scorpion pose (hip extension of the back leg). Players can also visualize other images for the landing, like a dancer in arabesque! Sometimes, I tell my students that the landing movement of the serve is like a donkey kick—this often makes them laugh. Use whatever relatable image resonates with the player.

Simple, gross motor movements are best to develop with both kids and adults before progressing to fine motor skills like shoulder internal rotation and wrist/forearm movements. I often delay grip adjustments until later in the process, allowing players to start with whatever grip feels most comfortable.
Upper Body Checkpoints
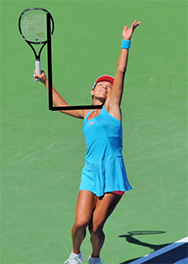
After working on the lower body keys, I go straight for the L-shape, or power position. I explain to my students that when the ball is tossed, the left arm and right arm have separate jobs. The left arm sends the ball into the air and points at the ball. The right arm lifts the racquet into the power position, which looks like the capital letter L. Two jobs--one for each arm.
Combine Lower and Upper Body
Now the student understands that the legs are supposed to jump and land, and the arms have their jobs. It's time to combine the upper and lower body movements and work on the timing of the leg drive vis-a-vis the power position and deep racquet drop.
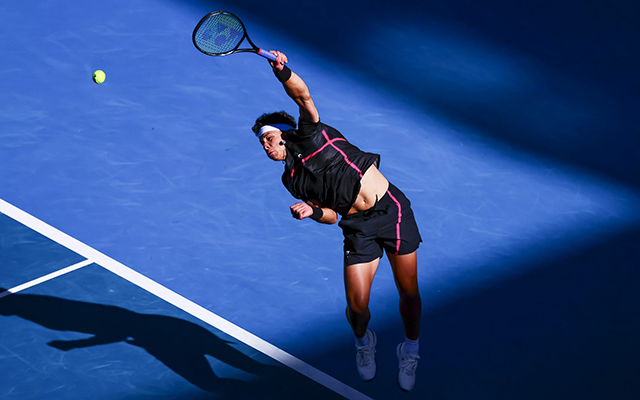
When the arms are up the legs are down. When the legs jump the racquet arm comes down deeply behind the back. I focus on these opposite movements to get the timing of the racquet drop correct in relation to the leg drive.
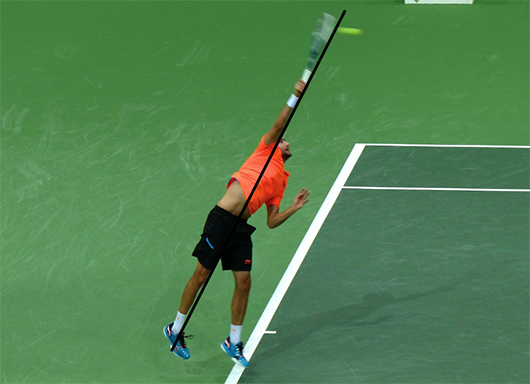
High speed video analysis shows that in advanced servers, the leg drive should trigger the racquet drop. That's the main focus when combining the upper and lower body movements. For most lower level players, it's the other way around: The racquet drop is early and the legs drive late.
The ideal sequence for maximum power is an early leg drive that forces the racquet lower in the deep backscratch.
When the legs are down the arms and racquet are up. When the legs start to explode up, the arms and the racquet start to drop. That's the critical timing sequence.
Use Video Analysis
Using video analysis is an important part of the Winning Pretty approach. The serve is too explosive and fast to watch all the details with the naked eye. You can improve your coach's eye by analyzing many serves, but even with a sharp eye for technique, check the slow motion video to verify what you have seen.
Chunking
When teaching or learning the serve, break up the technical skills into chunks, or smaller pieces at a time to help facilitate better motoric acquisition and mastery. I find that most players have success when focusing on a maximum of three concepts at a time. Keep it simple and work on a few techniques in isolation and then add other techniques later.
Keep it Simple: Consider Using A 5 Stage Method
While the eight stage model of the serve is brilliant and describes the biomechanical stages comprehensively, I have found that using a five step model has helped my students understand the serve primary components more easily. Keeping it simple is a major tenet of the Winning Pretty way. Five steps or stages are easier to remember than eight, especially for kids:
- 1. Start
- 2. Loading
- 3. Exploding/Acceleration
- 4. Contact
- 5. Finish
I will have my students work on each stage with reminders, visual demonstrations, and hands on manipulations.
1. Start
In the start, the player needs to find a comfortable stance, grip and practice linking the toss with the second stage, which is the power position or L-shape. It's important to also visualize and practice the correct location for the toss, which is forward into the court and typically between 12 and 1 o'clock from the player's head position.
2. Loading
The key in this step is to get into a good power position, storing energy before exploding with the legs.
3. Explosion/Acceleration
Some critical aspects here are the following:
- 1. The sequencing of the leg drive and racquet drop (legs should explode and transfer energy to the arm and upper body before the deep racquet drop).
- 2. Exploding up and into the court focusing on the back leg drive
Another critical aspect of the acceleration stage is the acceleration of the arm. It is critical to keep the arm and shoulder movement fluid and whippy as the racquet enters the backscratch and accelerates up to the ball at contact. Many players struggle with this part of the swing and lose power as a result. You need to fight any stiffness or tension in the arm and shoulder.
4. Contact
During this step, I like to have my students feel their bodies stretching upwards, which means lower body and upper body as close to a straight line as possible. Sometimes I will stretch them out myself by pulling them upwards while they hold onto the racquet up high.
Practice Drills
Next month we will conclude this Winning Pretty series on the serve with a focus on the finish as well as the "Three Stop" model. 10 more drills with be shown to help develop your serve. Stay tuned!